If you are searching for a secure and perfect solution to migrate your OST file data to Office 365, then you have come to the right place. In this guide, we will cover everything, from what OST file and Office 365 are, prominent reasons for migration, OST to Office 365 trends, major challenges, and planning & plotting to simplify your OST to Office 365 migration process.
What is an OST file?
An OST (Offline Storage Table) file is a local copy of your Outlook mailbox data that stores your emails, calendar, contacts, notes, and other data. With an OST file, you can work and access your data without having an internet connection when you are disconnected from the Exchange Server. Once you connect with the server, all your changes will synchronize to Exchange and update your tasks.
How is an OST file created?
When you set up an Exchange, Office 365, or IMAP account in Outlook with Cached Exchange Mode, Outlook creates an OST (Offline Storage Table) file as a local copy of your mailbox. Outlook creates it on your first connection and downloads your mail, calendar, and contacts.
What is Office 365?
Office 365, now Microsoft 365, is a cloud-based subscription service that provides you with access to Office apps, including Word, Excel, PowerPoint, Outlook, Teams, OneDrive, and AI features such as Copilot. You can use it on many devices for personal, family, business, or school use. It provides up-to-date software, smooth cloud integration for collaboration, and tools for productivity, communication, and security in one subscription.
Difference between OST V/S Office 365
Here is the detailed comparison table of OST vs Office 365 to easily understand how Office 365 is better to store your emails:
| Features | OST File | Office 365 |
|---|---|---|
| Type | Local mailbox file | Cloud-based email service |
| Storage Servers | Data stores on the device | Data stores on Microsoft servers |
| Access | Works without internet | Needs internet for full access |
| Purpose | Acts as a local copy of mailbox data | Acts as a full mail, calendar, and app platform |
| Data Safety | Risk of file damage or loss on the device | High security with backups and protection |
| Updates | Updates only when Outlook connects to the server | Always has the latest version and features |
| Device Use | Usable in only one system | Works on any device with a login |
| Management | User must handle file size and errors | Microsoft handles maintenance and security |
Why upload OST to Office 365?
Explore all the major reasons that prompt users to upload OST file to Office 365 (Microsoft 365).
- Universal Cloud Access: You can easily access your emails and data from any device, anywhere, and work remotely with just a proper internet connection.
- Enhanced Security: With OST to Office 365 Migration, you can utilize Microsoft's enterprise-grade security, including encryption and MFA, for better data protection.
- Simplified IT Costs: No need to manage on-premises servers and helps you save costs by minimizing IT workload, maintenance, and risks.
- Improved Collaboration: With Office 365 integration, you will get other M365 tools like Teams, OneDrive, and SharePoint.
- Business Continuity: Secure your emails and enhance your business continuity with cloud platform services.
- Surpass OST Limitations: Resolve storage limits and compliance issues often found with local OST files.
- Device Switching: Easily access your old mailbox data when moving to a new computer without losing access to local files.
OST to Office 365 Migration Trends
Check out all the recent trends that change users' intent and motivate them to import Outlook OST to Office 365:
- Cloud Adoption: The overarching trend is a continuous migration of email infrastructure from on-premises Exchange servers to the cloud-based Office 365 (now Microsoft 365) environment. This offers benefits like access from any device, anywhere, and integrated cloud-based collaboration tools (Teams, OneDrive, SharePoint).
- Automation and Simplified User Experience: The trend is towards automated, intuitive solutions that do not require technical expertise or prerequisite software like Microsoft Outlook or Exchange Server to be installed on the machine performing the migration.
- Hybrid Environments: While the ultimate goal is full cloud migration, many large organizations utilize a hybrid migration strategy, running both on-premises and cloud environments concurrently during the transition phase.
OST to Office 365 Migration - Prime Challenges
Find out all the challenges that occur when users try to upload OST to Office 365:
- No direct import option: Outlook or Office 365 does not give a direct way to import an OST file.
- Large file size issues: A large-sized OST file slows down the OST to Office 365 migration process or fails to upload.
- Mailbox data limits: Office 365 mailbox size limits may block full data transfer.
- Loss of data structure: Folders, contacts, and calendars may not stay in the same hierarchy after transfer.
- Account-related restrictions: OST files link to one profile, so access to data is hard without the original account.
- Security and permission issues: Some items may not move due to permission rules or encryption.
- Time consumption: The process may take time, especially for big mailboxes or slow networks.
Now, you are aware of all crucial challenges and unavailability of direct manual way to upload OST to Office 365. In that scenario, you must rely on an advanced OST to Office 365 Migration tool that will help you quickly import OST to Office 365.
However, before starting your OST to Office 365 Migration, let's start some preparation to avoid data loss and error chances.
OST to Office 365 Migration – How to Plan?
Make sure to follow these practices before uploading OST to Office 365 to save your data from corruption and loss.
1. Review OST Data and User Accounts
Check the OST file size, data type, and mailbox count in your Outlook so that you will be aware of your mailbox size, mails, and other data. After that, make sure each user has an active Office 365 account with enough space.
2. Prepare the source and destination
Make sure the OST file is accessible and free from error or corruption on the source system. Confirm user details, mailbox access, and file permissions in the destination Office 365 admin account.
3. Choose the Right Migration tool
Select a reliable Mailbox Migration tool that can import Outlook OST to Office 365 with all the files and folders intact. The EmailXport OST to Office 365 Migration is a trusted tool that supports direct OST file data transfer, selective export, and secure access to Office 365 accounts. It also reduces manual effort, saves time, and avoids common errors while importing OST file to Office 365.
Professional EmailXport OST to Office 365 Migration tool
Our OST to Office 365 Migration Tool offers a simple and secure way to move OST mailbox data to Office 365. It allows users to transfer emails, folders, contacts, calendars, and tasks without data loss. The tool supports large OST files and keeps the original folder structure intact. Let’s know all the top functionalities of this software.
Advanced features of OST to Office 365 Migration tool
- Quickly move single /multiple large-sized OST files to Office 365.
- Transfer OST emails, contacts, calendars, tasks, and other data.
- Mapping wizard to migrate the specific OST file to the selected O365 user.
- An advanced date range filter to migrate selective data from the OST file to Office 365.
- Maintain original folder hierarchy and metadata in the destination account.
- User-friendly and interactive interface for both technical and non-technical users.
- Free trial version to migrate 50 items per folder without paying any cost.
Free download the EmailXport OST to Office 365 migration tool to explore its advanced features and see how it handles your migration needs with ease and accuracy.
How to import Outlook OST to Office 365
Go through this step-by-step guide to migrate OST file to Office 365:
Step 1: Download, install, and launch the OST to Office 365 Migration software.
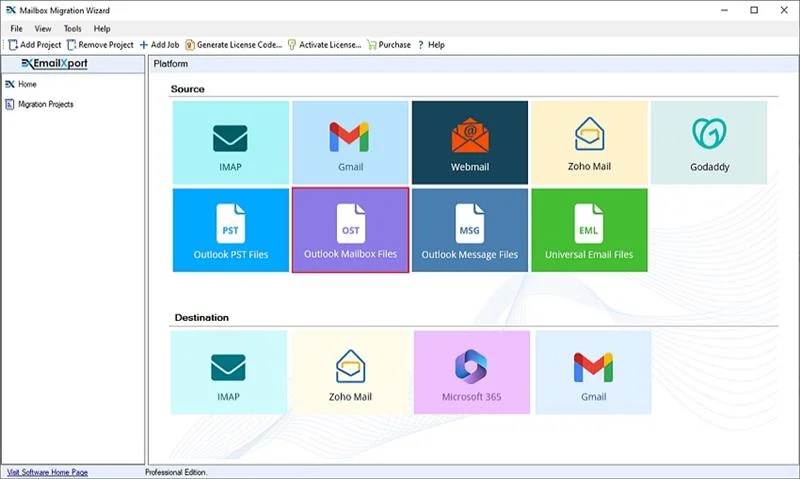
Step 2: On the software’s homescreen, click on OST tile.
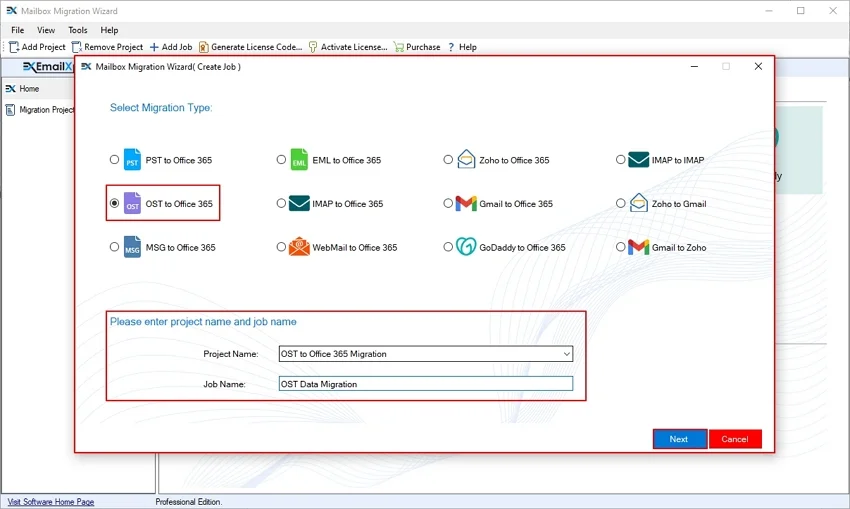
Step 3: In the Select Migration Type window, click OST to Office 365 option. Under migration option, enter Project Name, Job Name and click Next.
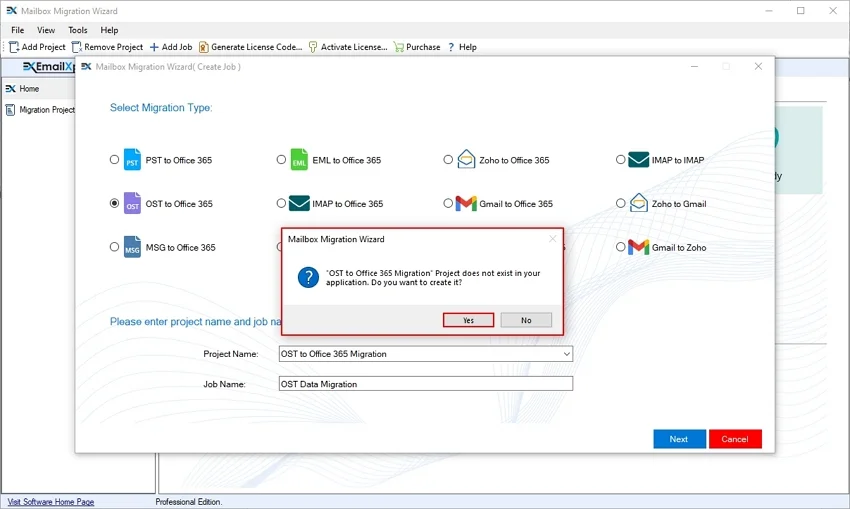
Step 4: In the following window, click Yes to create Project and Job.
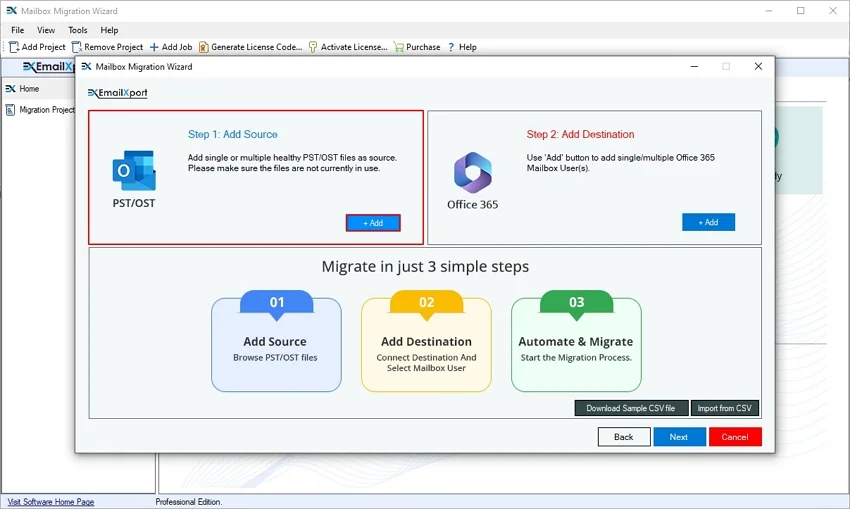
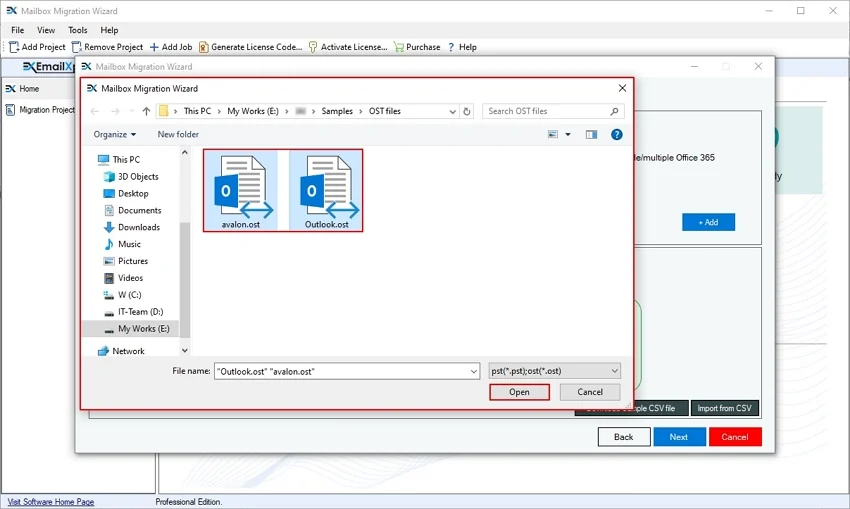
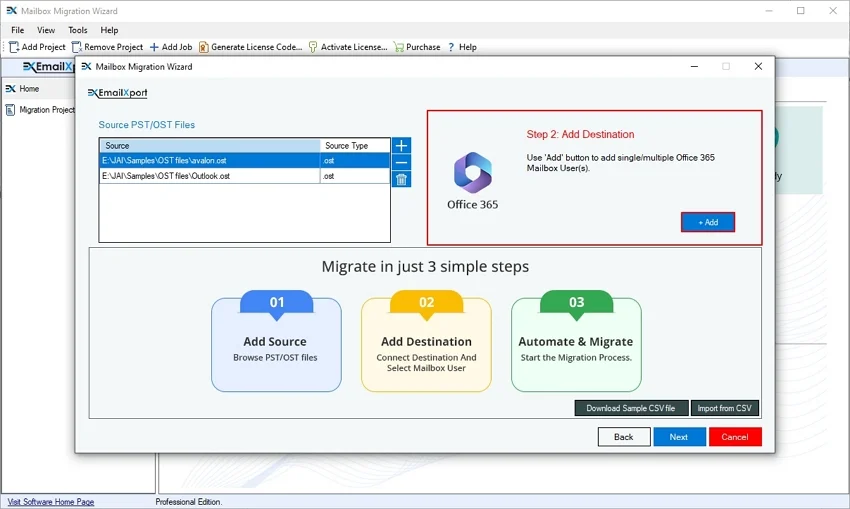
Step 5: Click on Add in the Add Source tile.
Step 6: Select single or multiple OST files from your local disk and click Open.
Step 7: Now, click on Add in the Add Destination tile.
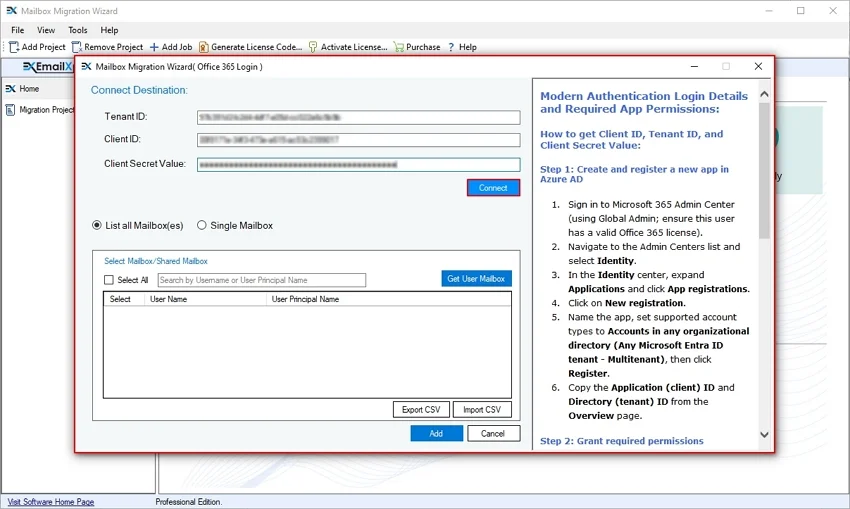
Step 8: Enter Tenant ID, Client ID, and Client Secret in the Connect Destination window. Click Connect.
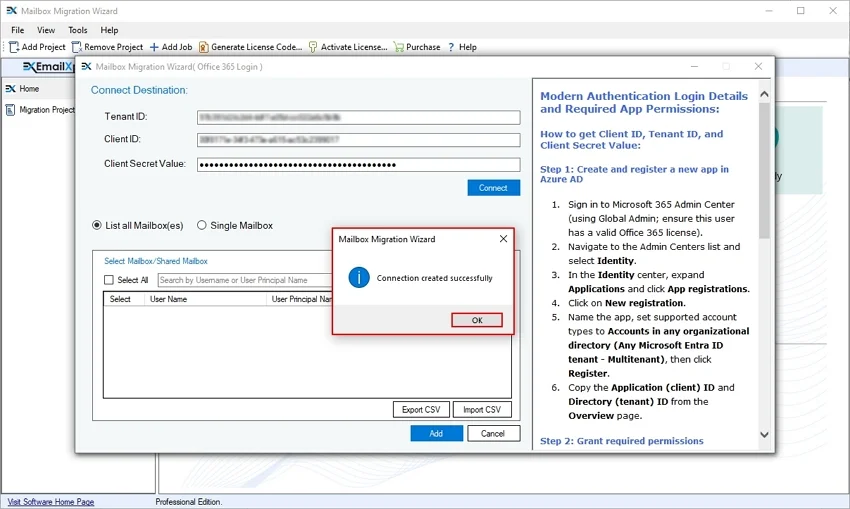
Step 9: The software will connect to the destination Office 365 admin account and pop up a “Connection created successfully” message. Click OK.
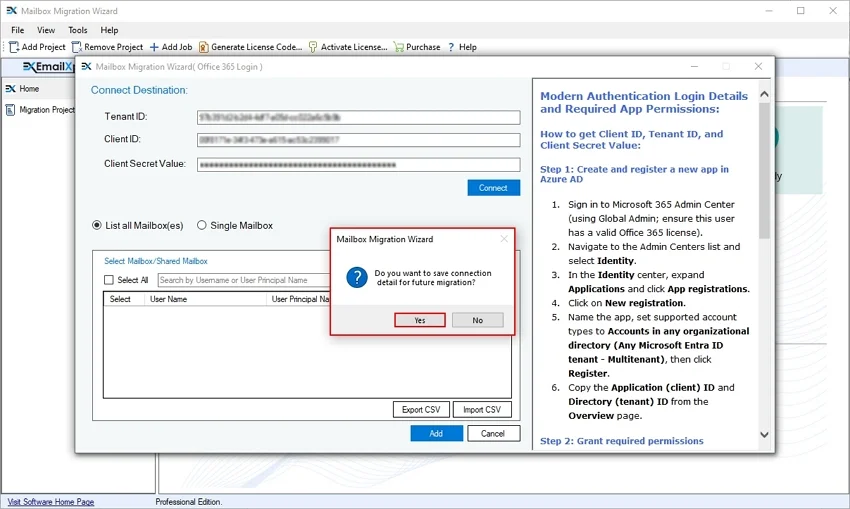
Step 10: If you want to save Office 365 credentials for future migration, then click Yes; otherwise, click No.
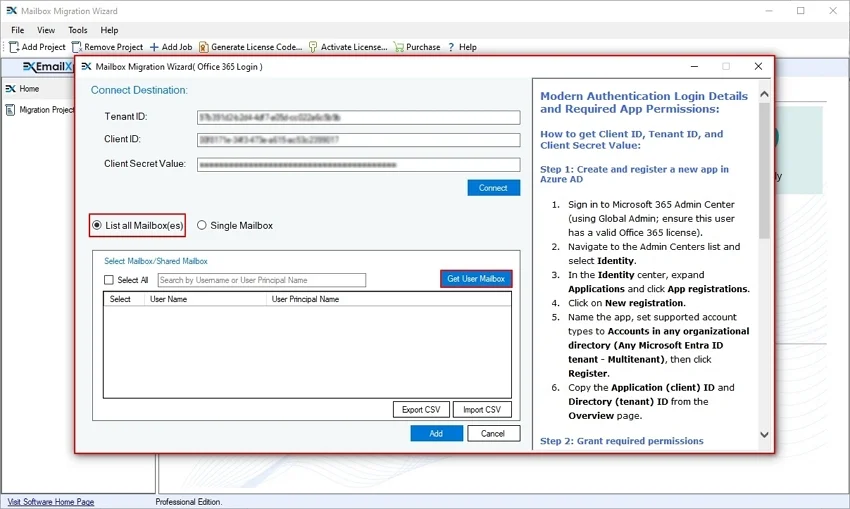
Step 11: Click on List all Mailbox(es) to retrieve all the user mailboxes from the admin account and click on Get User Mailboxes.
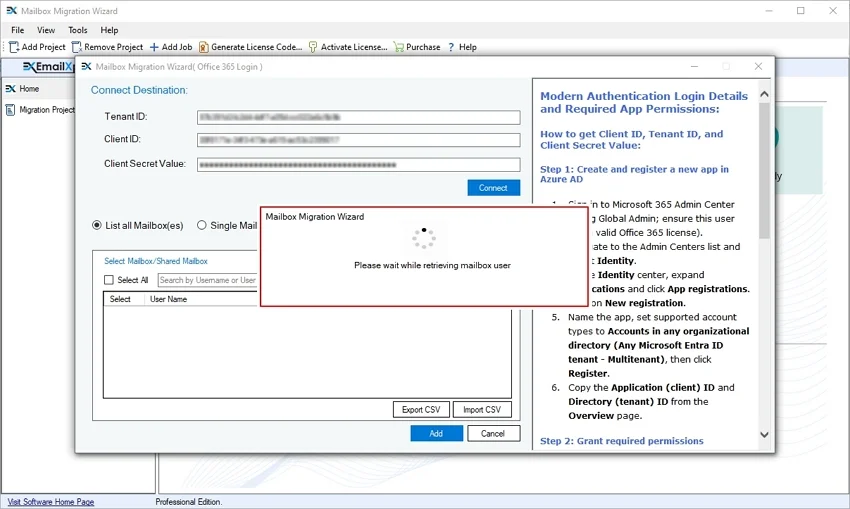
Step 12: The software will start retrieving all the users from the admin account and show “Please wait while retrieving mailbox user” message.
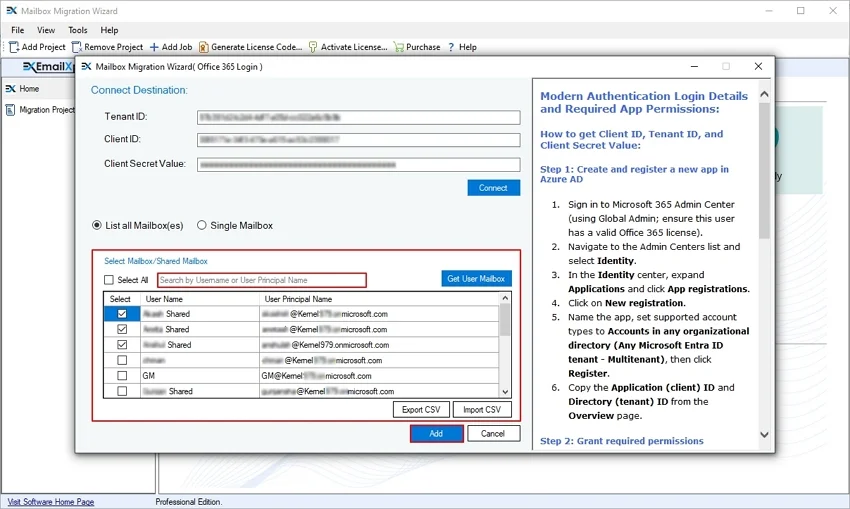
Step 13: The software will list all the mailboxes. Select the required mailboxes and click Add. Use Search bar to find a specific mailbox from multiple ones.
Note: Export CSV file of all the Office 365 users for future migration purposes.
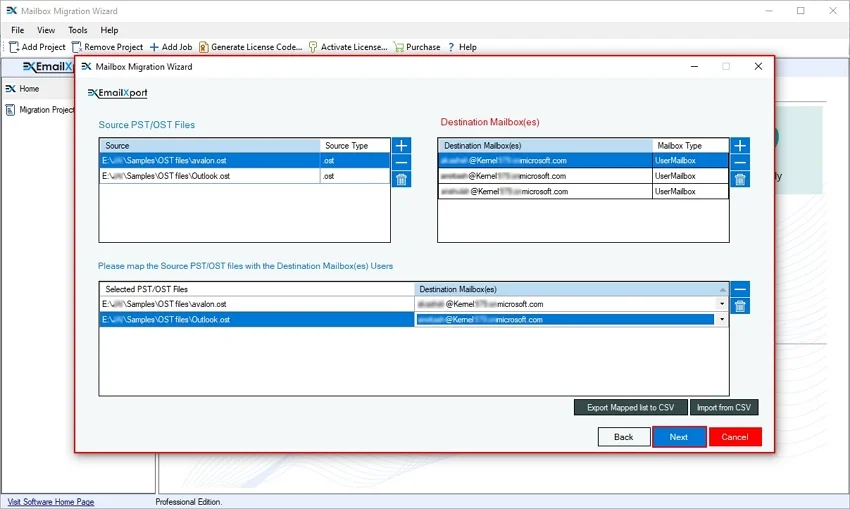
Step 14: In the following window, map the source OST file with the desired Office 365 mailbox, and click Next.
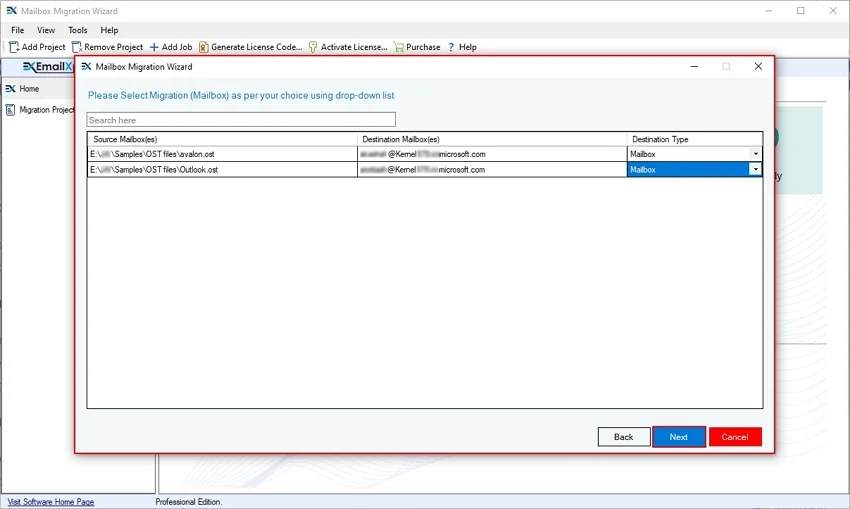
Step 15: In the following window, select Mailbox type, and click Next.
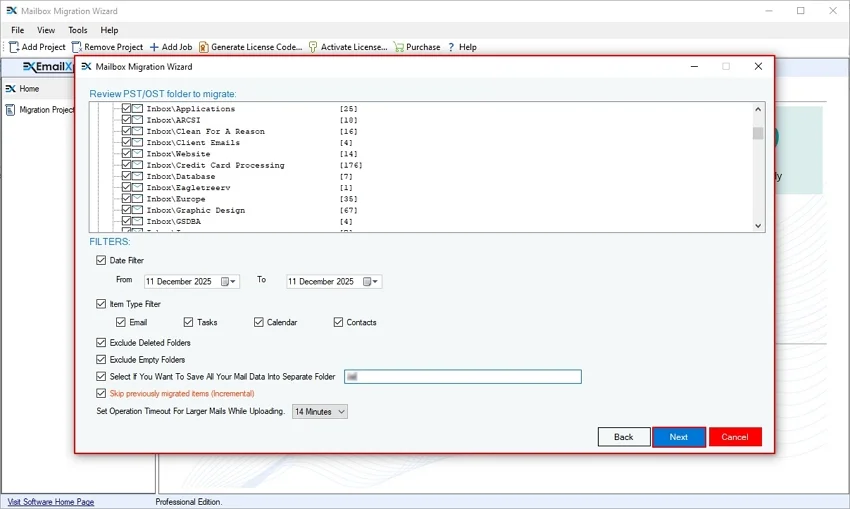
Step 16: In the Filter window, apply multiple options from:
- Review the OST folder to migrate: Select the necessary folders from your selected OST files.
- Date Filter: Select From and To dates to migrate the OST data of specific dates.
- Item Type Filter: Migrate files from: Email, Tasks, Calendar, and Contacts
- Exclude Deleted Folders: Exclude migrating OST file’s deleted folder.
- Exclude Empty Folders: Skip transferring selected OST file’s empty folders.
- Select If You Want To Save All Your Mail Data into Separate Folder: Save all the OST file data in a specific folder in the Office 365 account in the original hierarchy.
- Skip previously migrated items (Incremental): Migrate only newly added data from the OST file.
- Set Operation Timeout for Larger Mails While Uploading: If any Mail takes longer than the selected operation timeout, then the software will exclude that file and start migrating another file.
Finally, after selecting all the options, click Next.
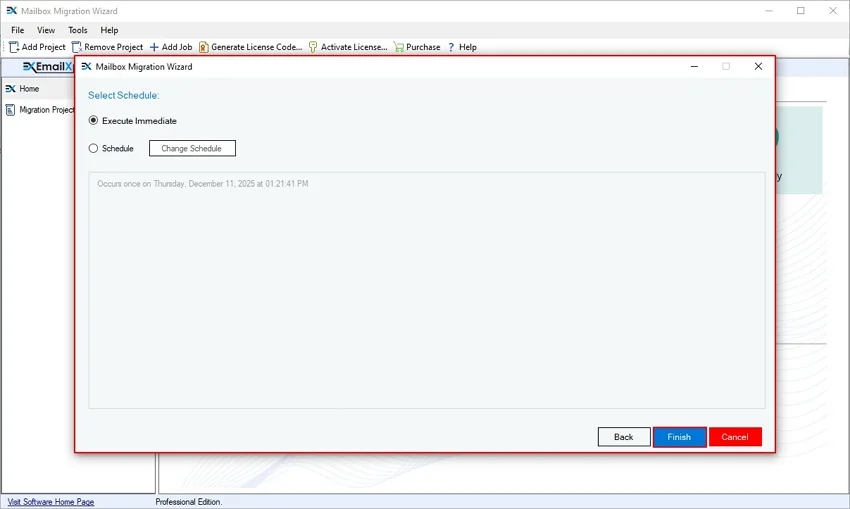
Step 17: Automate your migration process in the Select Schedule window. Select Execute Immediate to start migrating immediately, or Schedule your migration for a specific time period. Click Finish to start OST to Office 365 migration process.
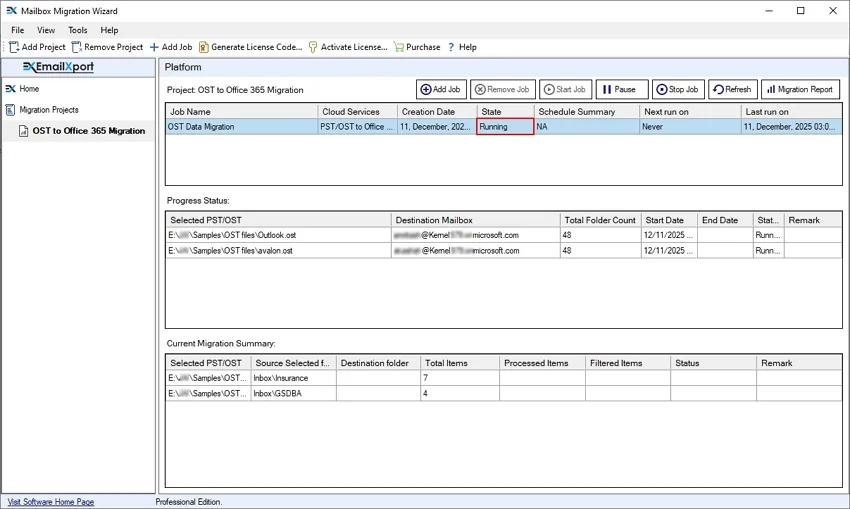
Step 18: The software will start migrating OST file to Office 365 and show status as Running.
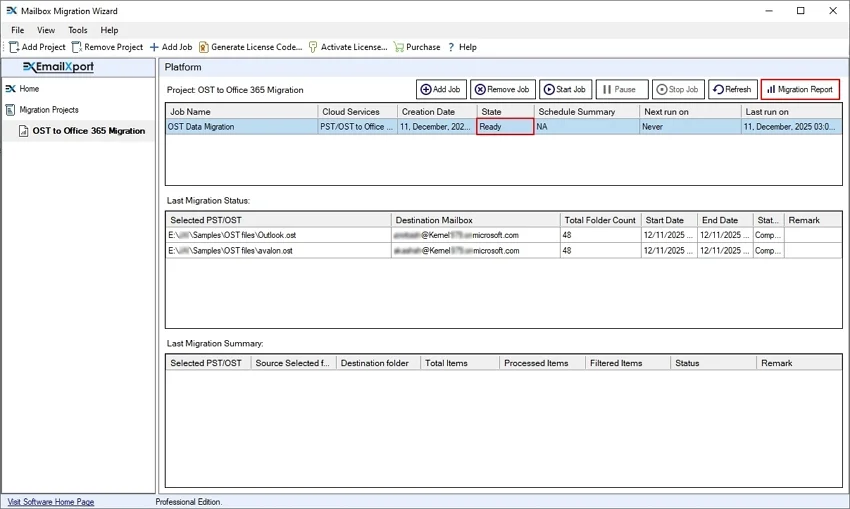
Step 19: After a successful OST to Office 365 migration, the software will show Ready status. Click on Migration Report to generate and download a summary or a detailed migration report.
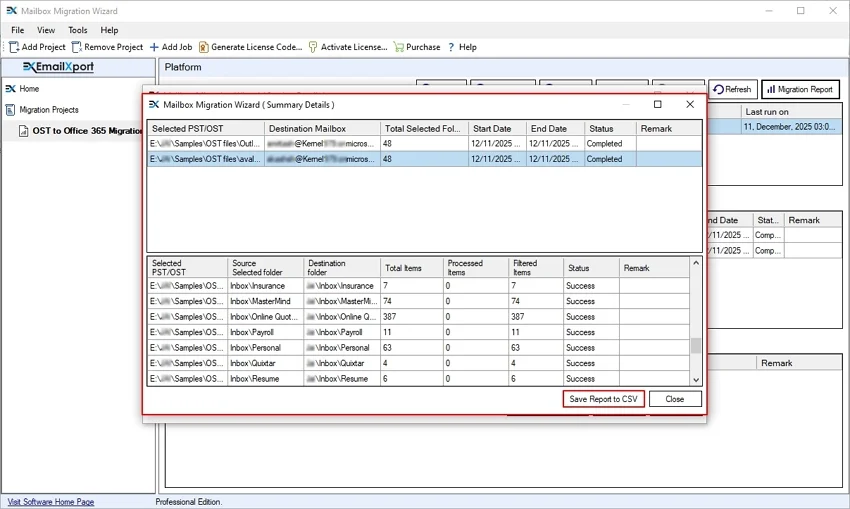
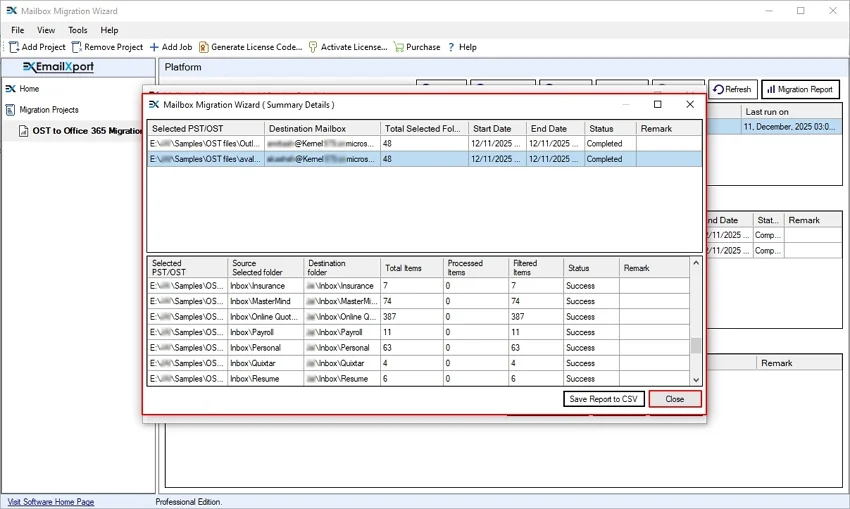
Step 20: The software will show the Summary Report. Download it by clicking on Save Report to CSV. Additionally, click on View Details to download a detailed report.
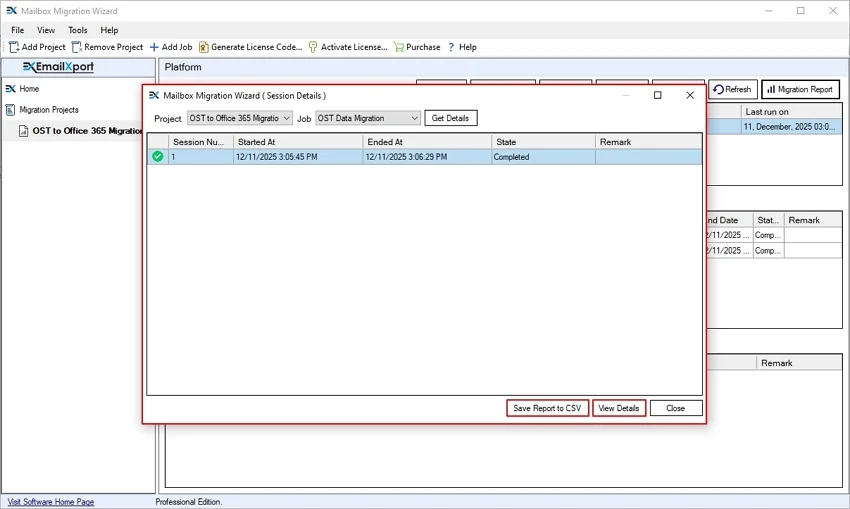
Step 21: The software will show complete migration details and then click Save Report to CSV.
Step 22: Select a desired drive or folder to save the detailed migration report.
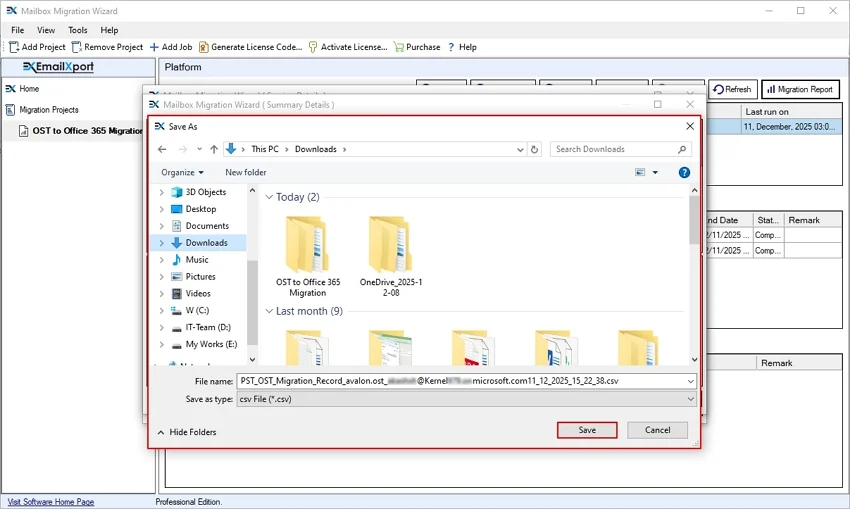
Step 23: After saving the migration report, the software will pop up a “CSV file saved successfully” message and click OK.
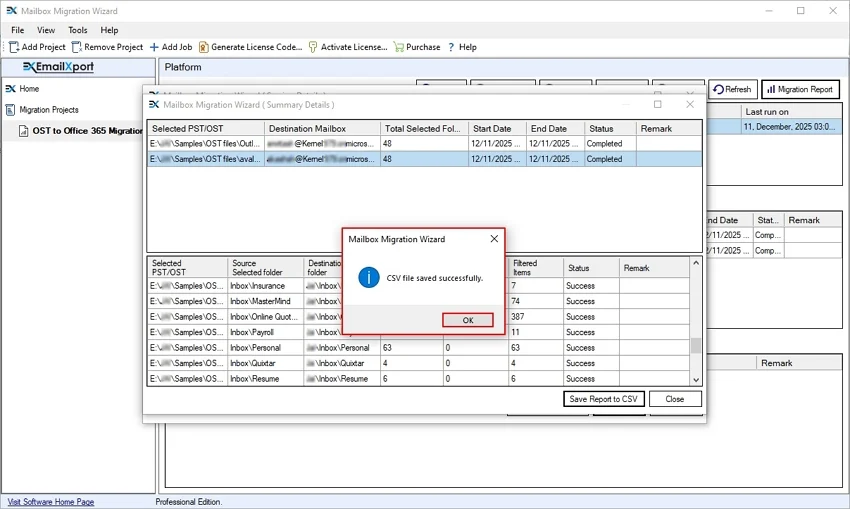
Step 24: Finally, click on Close to exit the migration process.
Post Migration Activities
After a successful migration, make sure to check these points to know about your migration result:
- Verify Data Accuracy: Check each mailbox to confirm that emails, folders, contacts, and calendars appear correctly in Office 365. Compare item count and folder order to avoid missing data.
- Security and Final Setup: After getting your data, apply security rules, backup options, and access policies as per the company's needs. Share basic guidance with users to help them use Office 365 features with ease.
Conclusion
OST to Office 365 migration helps users move mailbox data from a local Outlook file to a secure cloud platform. As you know, Office 365 offers instant file access, strong security, and easy data control across devices. With proper planning and the recommended OST to Office 365 migration tool, users can easily upload OST to Office 365 without data loss.
Frequently Asked Questions
Check out all the common queries and their answers about our OST to Office 365 Migration tool.
Q. How can I import bulk OST files to Office 365?
Ans. Here is the step-by-step guide to upload bulk OST files to Office 365:
- Download, install, and launch EmailXport OST to Office 365 Migration tool:
- Add bulk OST files to the tool and add an Office 365 admin account.
- Map OST file to desired O365 user accounts and Next.
- In the following window, select Destination Type and click Next.
- Apply filters and schedule your OST to Office 365 Migration.
- After migrating your OST data, download a detailed migration report in a CSV file.
Q. Is there any manual method to upload OST to Office 365?
Ans. There is no direct manual way to import Outlook OST to Office 365. You need to export your Outlook OST file to PST. After that, use Azure AzCopy to upload the PST to Azure Storage, then use Network Upload in the Microsoft 365 Compliance center to import it.
Q. Why should I import OST to Office 365?
Ans. You can only access your OST files on your Outlook. Whereas Office 365 allows you to access all your data online from any remote location.
Q. Can I move OST data without Outlook?
Ans. Yes, a professional EmailXport OST to Office 365 Migration tool can move OST data without Outlook access.
Q. Is an Office 365 admin account required to upload OST to Office 365?
Ans. Yes, you need an active Office 365 admin account to upload your OST file to Office 365.
Q. Does the OST to Office 365 Migration tool move calendar and contacts to Office 365?
Ans. Yes, our tool can easily migrate OST file emails, contacts, calendars, and tasks to Office 365.
Q. Can I move OST data from a deleted account?
Ans. If you have an OST file of a deleted account, then you can easily migrate OST file to Office 365.
Q. Can I stop or start the migration process in the meantime?
Ans. Yes, our tool offers multiple options during OST to Office 365 migration to Start, Pause, and Stop the migration process accordingly.

Abhishek Pandey is a Senior Technical Content Writer with expertise in email migration, cloud migration, and enterprise software documentation. He creates simple and accurate technical content that helps IT professionals and end users handle complex email and cloud technologies with confidence.