
When you need to store all your MSG files, scattered in different locations, in one centralized platform that allows you anytime & anywhere access, Office 365 is the perfect place for it. Moving further, you will get to know what MSG file & Office 365 is, and how you can import MSG to Office 365 without Outlook. Moreover, we will cover reasons, trends, major challenges, and migration planning to simplify your MSG to Office 365 migration process.
What is an MSG file?
An MSG file is a distinct file format used by Microsoft Outlook. It can store a single email message, contact, appointment, or even task. Unlike PST or OST, an MSG file stores one individual item along with its message, properties, attachments, and metadata. Users and organizations often rely on this file format to archive specific emails manually.
What is Office 365?
Unlike MSG files, Office 365 is a combination of several applications. Collectively, they are known as Microsoft 365 Office suite. A cloud-based subscription service that provides you access to Word, Excel, PowerPoint, Outlook, Teams, OneDrive, AI (Copilot), and many more powerful applications.
Being a Saas, the suite of applications is accessible on multiple devices. This is one of the reasons why migrate MSG to Office 365.
MSG vs Office 365 | Core Difference
Check out the detailed comparison between MSG and Office 365 to quickly grasp why Office 365 is better for storing your emails:
| Features | MSG File | Office 365 |
|---|---|---|
| Type | Single email/item file | Cloud-based email service |
| Storage | Local Hard Drive/Network Share | Data stores on Microsoft servers |
| Access | Requires local access to the file path | Accessible from any device via internet |
| Searchability | Difficult (Slow Windows indexing) | Advanced, instant eDiscovery & Search |
| Data Safety | High risk of accidental deletion/corruption | High security with backups and protection |
| Collaboration | Static file (cannot be edited collaboratively) | Real-time sharing and collaboration |
| Management | Decentralized (scattered across folders) | Centralized management via Admin Center |
Why Should You Migrate MSG to Office 365?
The primary reasons for most of the individual users as well as large organizations to move to Microsoft 365 are:
- Centralized Data Management: Office 365 serves as a platform that stores all your emails in a single location for easy management.
- Universal Cloud Access: Access emails from any device, anywhere. You only need an active internet connection on the device.
- Enhanced Security: Utilize Microsoft's enterprise-grade security, perform message encryption, or implement MFA.
- Improved Search & Compliance: Office 365 offers powerful eDiscovery tools to find data instantly for legal or compliance needs.
- Prevent Data Decay: Local files can become corrupted or inaccessible over time due to hardware failure. Cloud storage guarantees data availability.
MSG to Office 365 Migration - Common Challenges
These are the most common challenges that occur when users try to upload MSG to Office 365:
- Move Large Volume Files: When you are moving MSGs, you don’t just send a dozen files, but migrate tens of thousands of individual MSG files. Sometimes, this large number of files can cause Explorer crashes or slow processing.
- No Direct Bulk Import: There is no dedicated option to import MSG in Outlook. Manually importing thousands of emails into folders is a tedious task.
- Loss of Folder Structure: When moving files manually, it is hard to keep the original folder structure. You have to manually create the folder hierarchy. This becomes especially troublesome in case of multiple nested folders.
- Metadata Modification: Manually moving files can sometimes alter the "Date Modified" or "Created Date" attributes, messing up the order in which emails are displayed.
- Time Consumption: Uploading small files one by one is significantly slower than uploading a single large mailbox file (OST, PST).
You might be wondering, is there any easy way to migrate MSG to Office 365? Fortunately, there is. You can prevent all the above-mentioned challenges and perform a hassle-free migration with an advanced MSG to Office Migration tool with 100% data security.
Moving further, I will show you the step-by-step process of moving bulk MSG files to cloud (Office 365). But before that, let’s discuss the migration strategy recommended by experts to make the migration as smooth as possible.
MSG to Office 365 Migration – How to Plan?
For an error-free migration, you must complete the following tasks before uploading MSG to Office 365.
1. Gather all the MSG files
Find and move all the source files/folders into a single directory on your local system. You can also choose a network drive, but as per my experience, local storage is better. Then, evaluate the total number of files you are moving and the total combined size of these files. Furthermore, check for MSG file data integrity and repair any damaged files from the migration.
Note: Also, make sure none of the MSG files are opened in Outlook or any similar application.
2. Prepare the Destination
You must have an active Microsoft 365 account with enough storage to accommodate all the new emails. Also, create the user's mailbox, if not already present, in which you want to migrate all the MSG files. Lastly, create the Microsoft Entra ID for secure login, in case you have MFA (Multi Factor Authentication) enabled.
3. Choose the Right Migration Method
If you only have a few MSG files, you can go with the manual drag-and-drop method. But for a large email migration that amounts to multiple GBs of data, your best option is to use a professional Mailbox Migration Software. The EmailXport MSG to Office 365 Migration tool is a trusted software used for bulk MSG file migration while keeping attachments and folder hierarchy intact. Use it to automate the complete MSG to Office 365 migration process.
Professional EmailXport MSG to Office 365 Migration Tool
Used and trusted by IT admins, our MSG to Office 365 Migration tool allows you to securely migrate MSG to Office 365 account (all subscriptions supported). Whether you need to move a single email or perform bulk email migration, the tool guarantees a bug-free migration. All your email components (message, sender/receiver email address, attachments, send date, key attributes, etc.) are moved to your specified destination.
Advanced features of MSG to Office 365 Migration tool
- Bulk Migration: Quickly move thousands of MSG files from multiple folders to Office 365 in one go.
- Retains Folder Hierarchy: Automatically detects and maintains the folder hierarchy from your Windows directory into the Office 365 mailbox.
- Complete Data Transfer: Migrates your emails, contacts, calendars, etc., items saved in MSG format with all attributes intact.
- User Mailbox Mapping: The tool allows you to choose and map all the MSG files/folders to the Office 365 user account of your choice
- Date Range Filter: Specify a start and end date and migrate selective emails based on date. Useful when you need to move data year or month-wise.
- Metadata Preservation: Maintains Read/Unread status, Subject, Sender, Receiver, and Original Timestamps.
- User-friendly Interface: Interactive GUI suitable for both technical admins and non-technical users.
- Free Trial Version: Migrate 50 items per folder without paying anything. The trial version will work for 15 days, and after that, you must buy the license for unlimited MSG file migration.
Download the free version of the EmailXport MSG to Office 365 migration tool and migrate 50 MSG files for free.
How to Move Outlook MSG to Office 365?
Check out the step-by-step guide to migrate MSG files to Office 365:
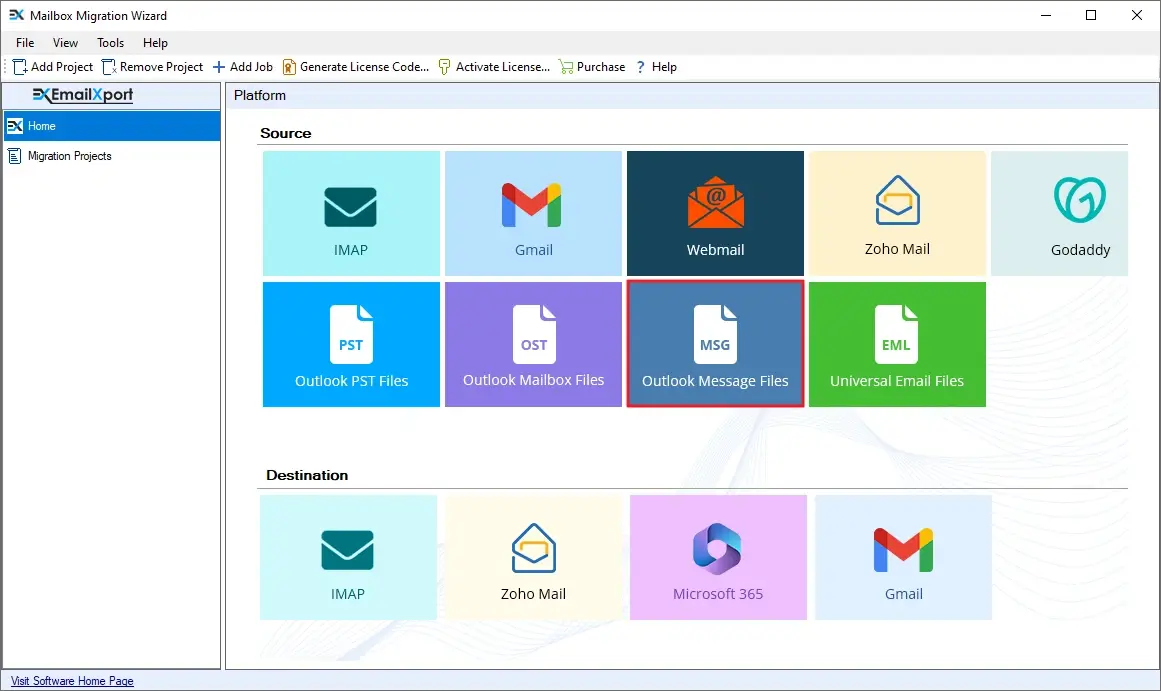
Step 1: Download, install, and launch the tool. At the home screen, click on the MSG tile.
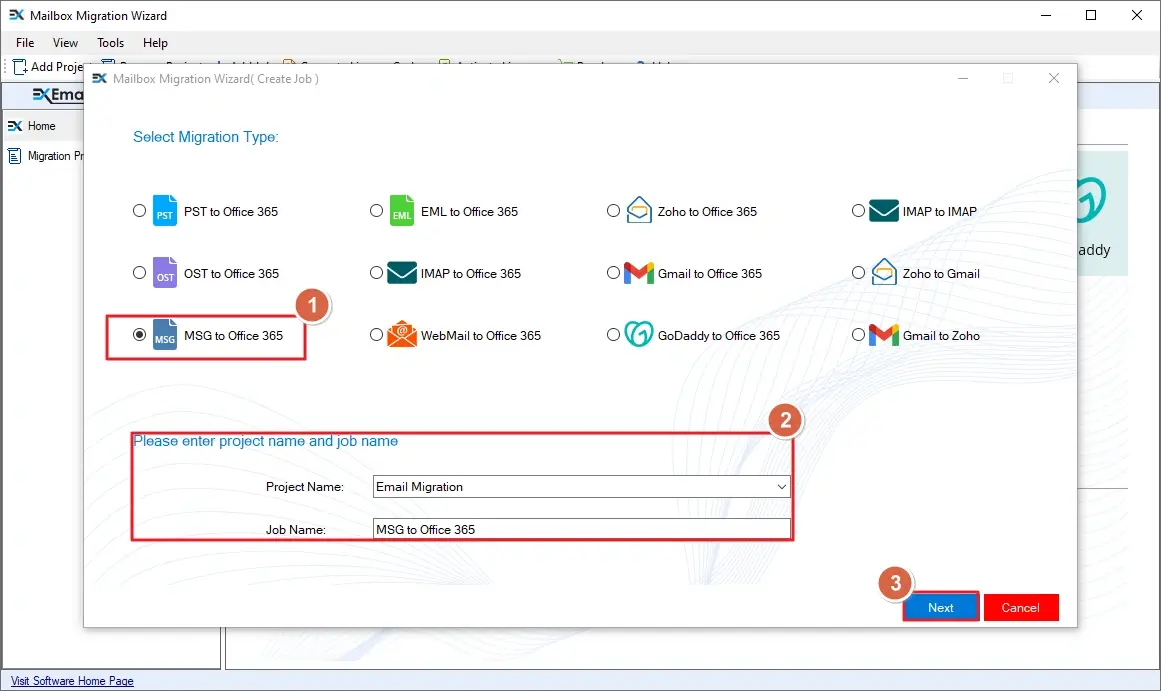
Step 2: In the Select Migration Type window, click the MSG to Office 365 option. Provide a Project Name, Job Name, and click Next.
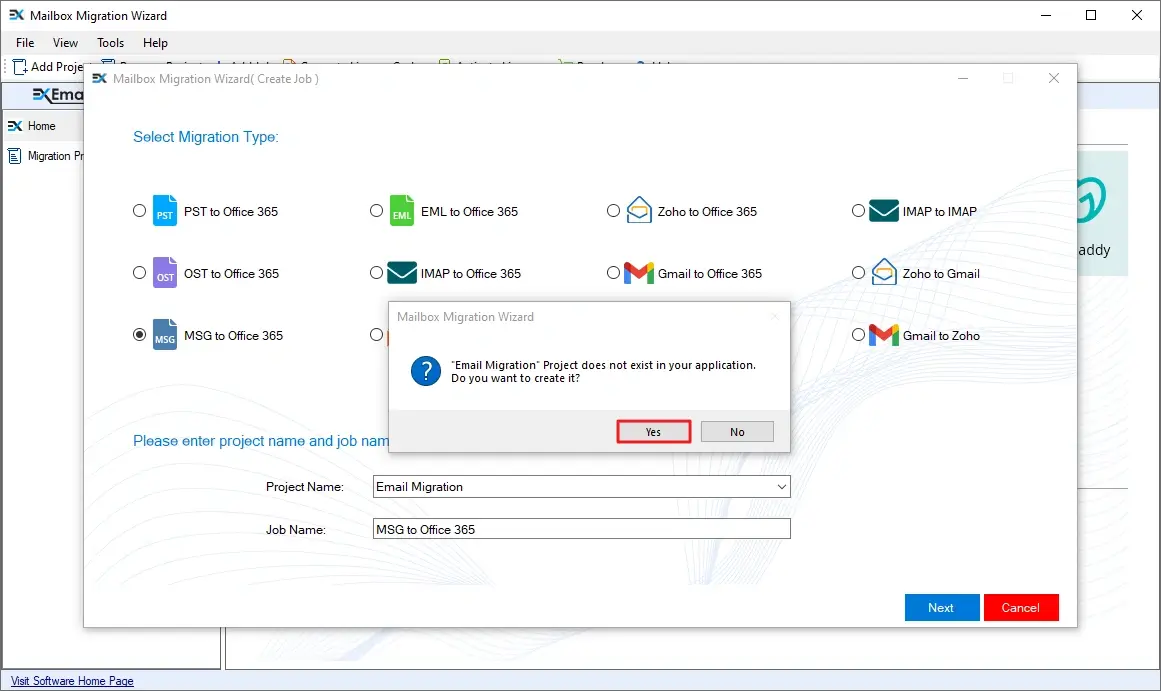
Step 3: When the MSG to Office 365 software asks to create the Project, click Yes.
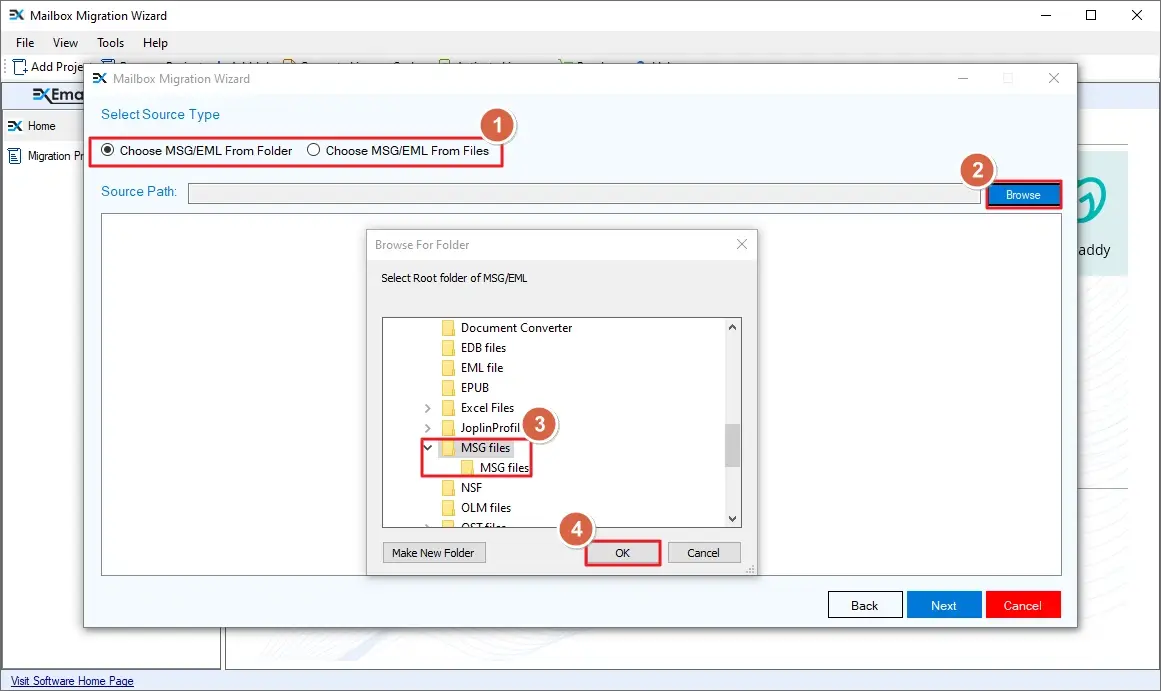
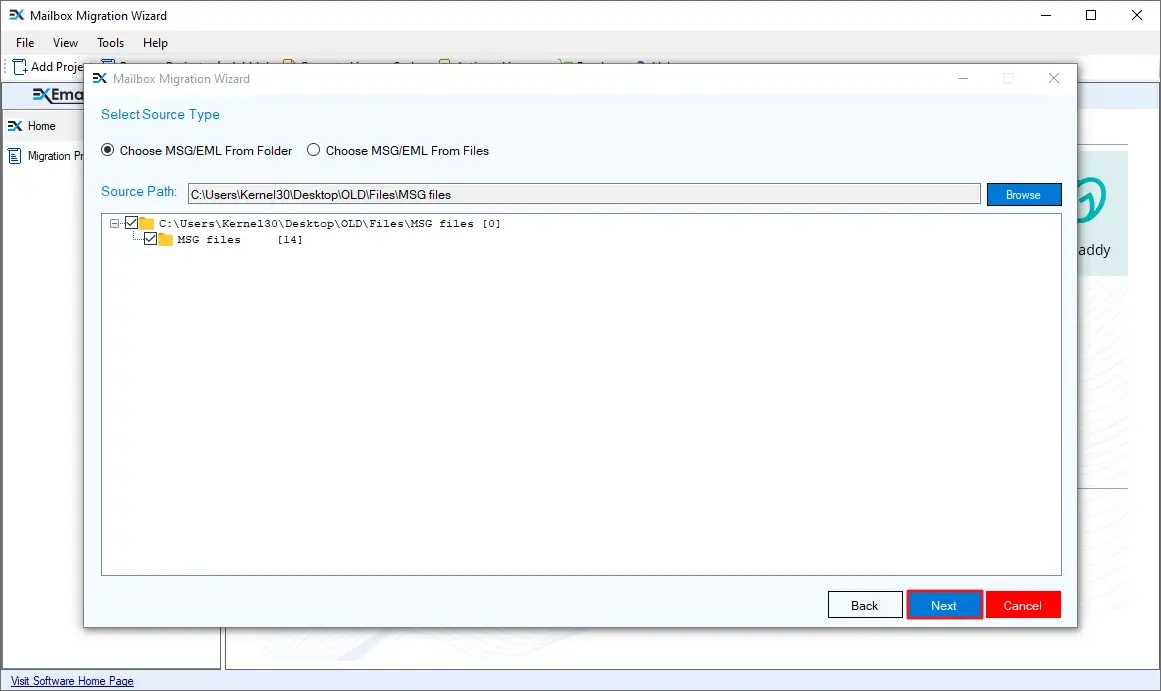
Step 4: Select the file choosing option. Then click Browse and select the folder that contains MSG files, and click OK to add them.
Step 5: After adding the MSG files/folders, click Next.
Step 6: Now, enter the Tenant ID, Client ID, and Client Secret of the target Office 365 credentials and click Next.
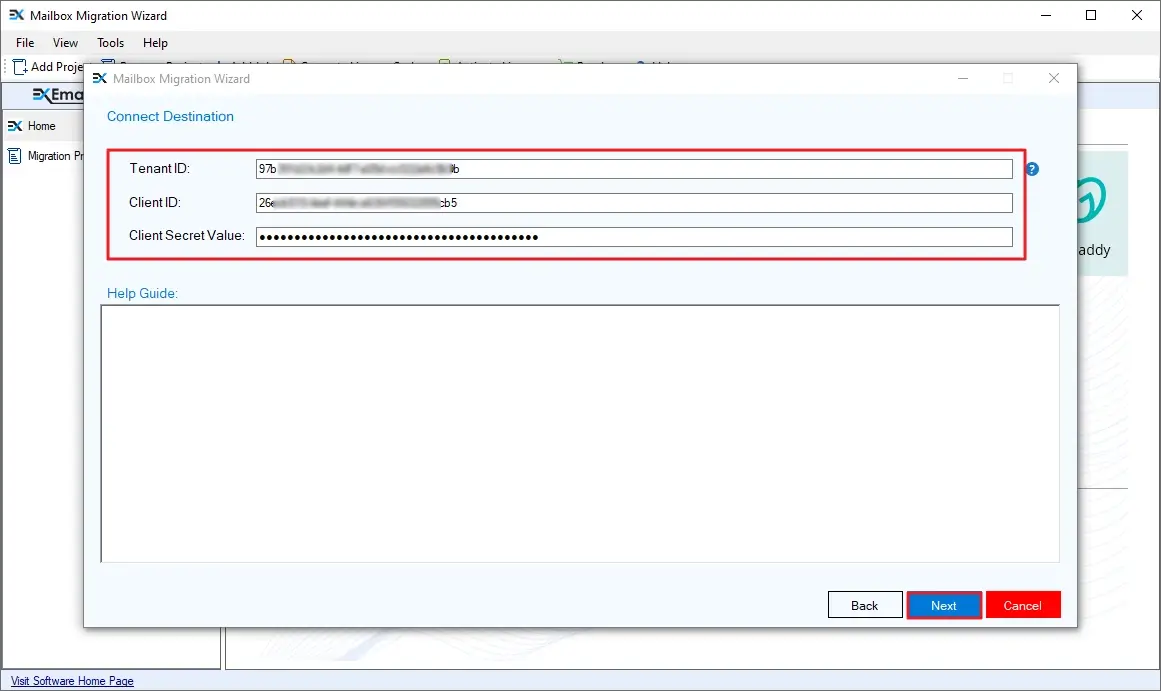
Step 7: Click Yes when the tool asks to save the credentials.

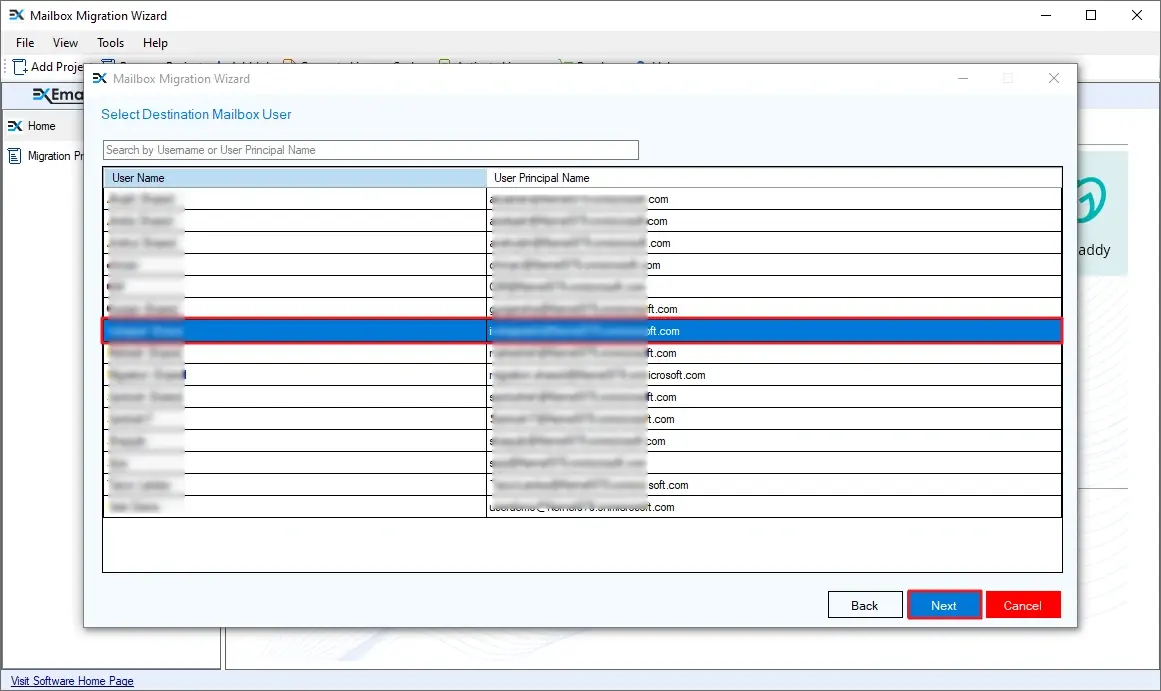
Step 8: Choose the destination mailbox and click Next to continue.
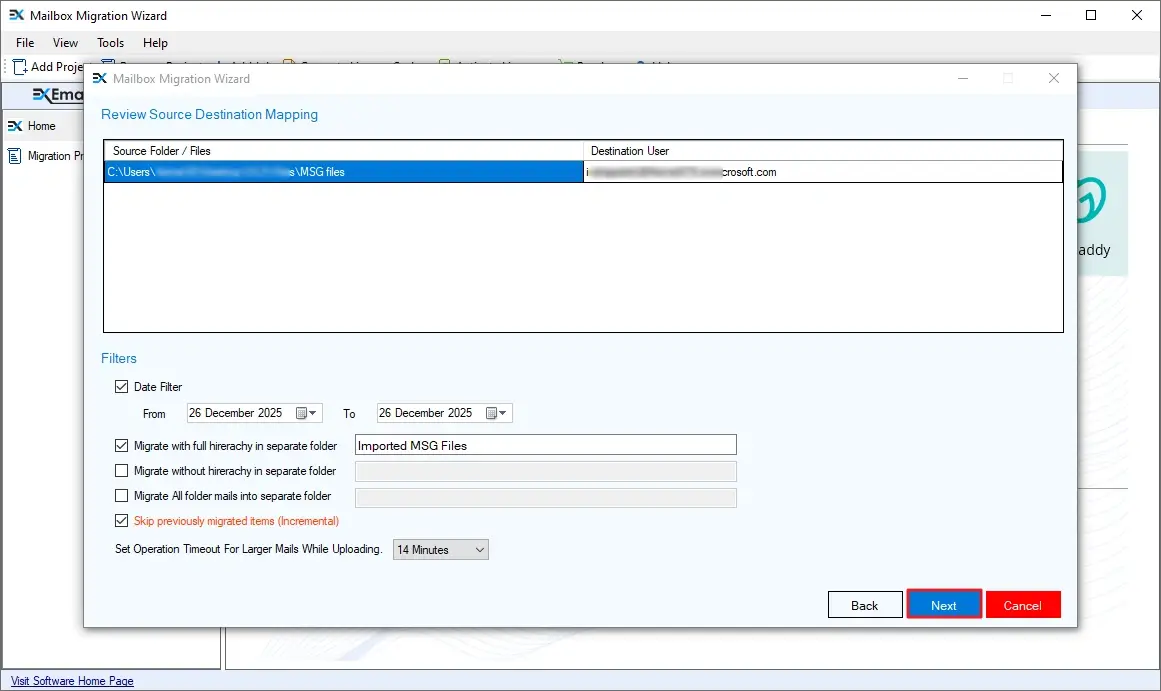
Step 9: The tool provides several filters. Apply them as per your requirement:
- Date Filter: Select From and To dates to migrate the MSG data of specific dates.
- Migrate with full hierarchy in separate folder: Save all the MSG file data in a specific custom folder while retaining the source MSG folder structure.
- Migrate without hierarchy in separate folder: Save all the MSG file data in a specific custom folder without retaining the source folder hierarchy.
- Migrate all folders emails into separate folder: Move all the emails from different source folders into a single destination folder.
- Skip previously migrated items (Incremental): Migrate only newly added MSG files if rerunning the Job.
Finally, click Next to continue.
Step 10: To run the migration instantly, select the Execute Immediate option and click Next.
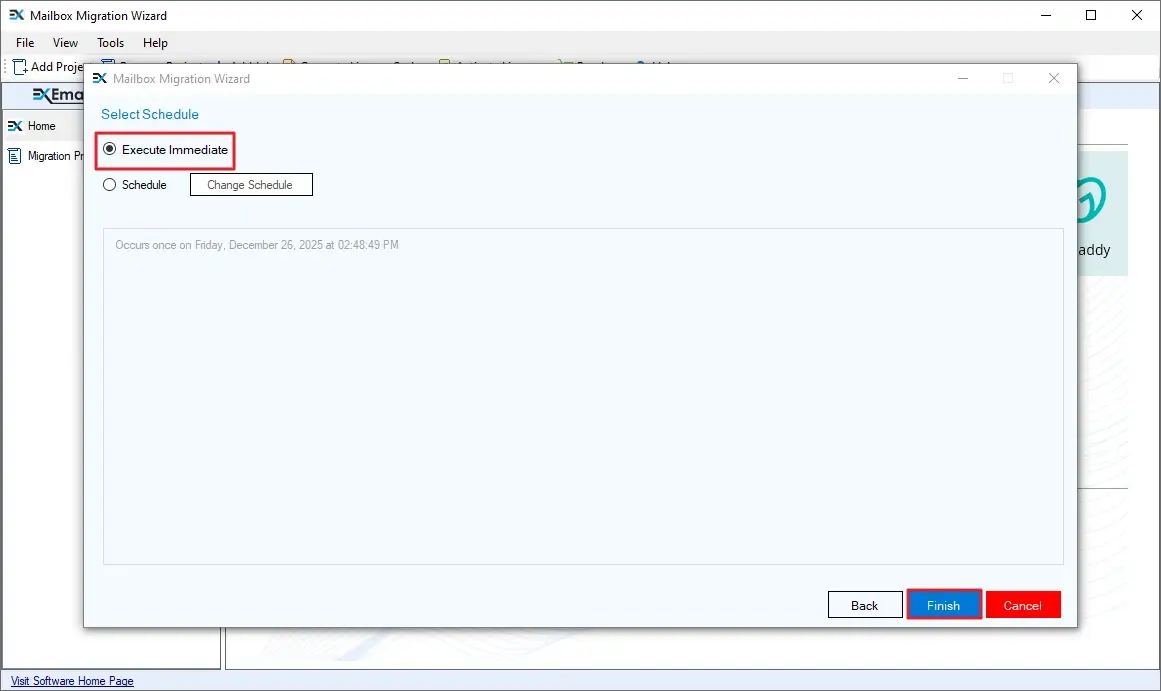
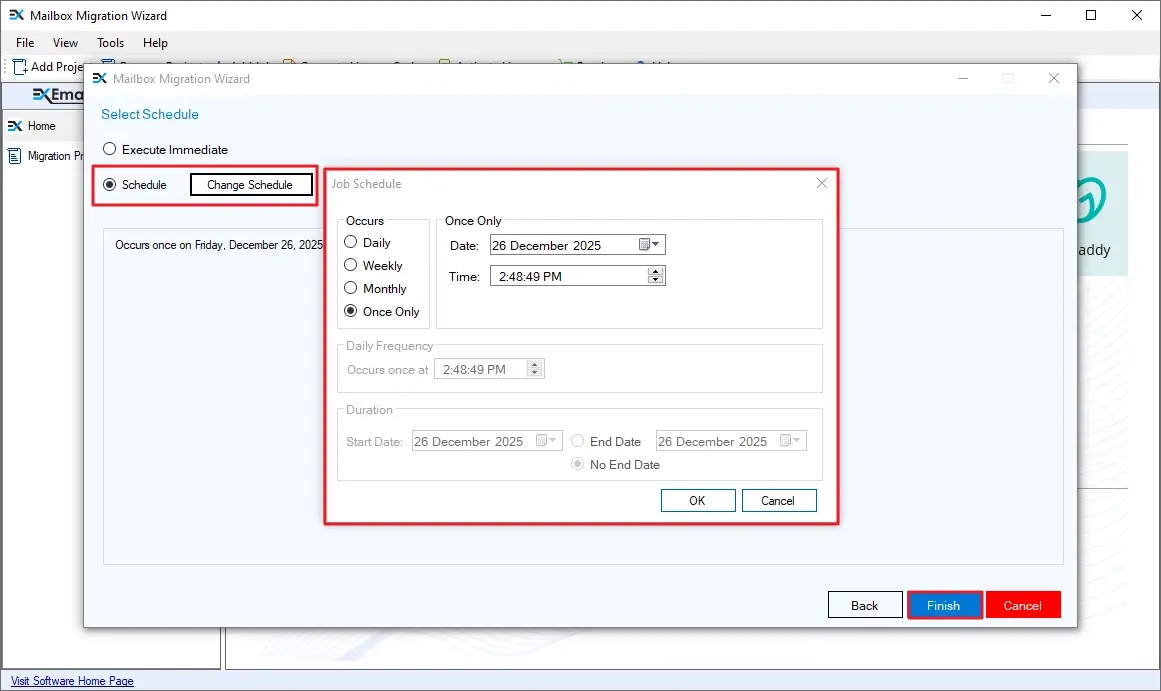
Note: You can also schedule the migration as per your requirement using the Schedule option. Select Schedule > Change Schedule and specify the date, time, and occurring frequency.
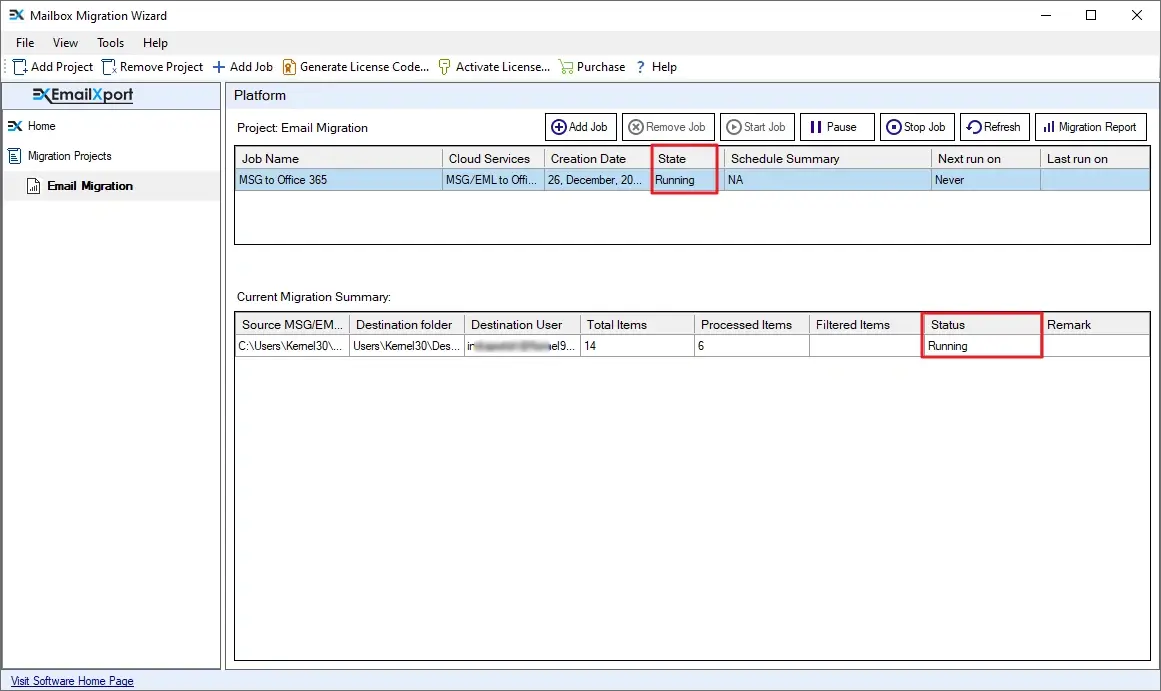
Step 11: MSG to Office 365 migration begins. Notice the State of the Job. It will be shown as Running.
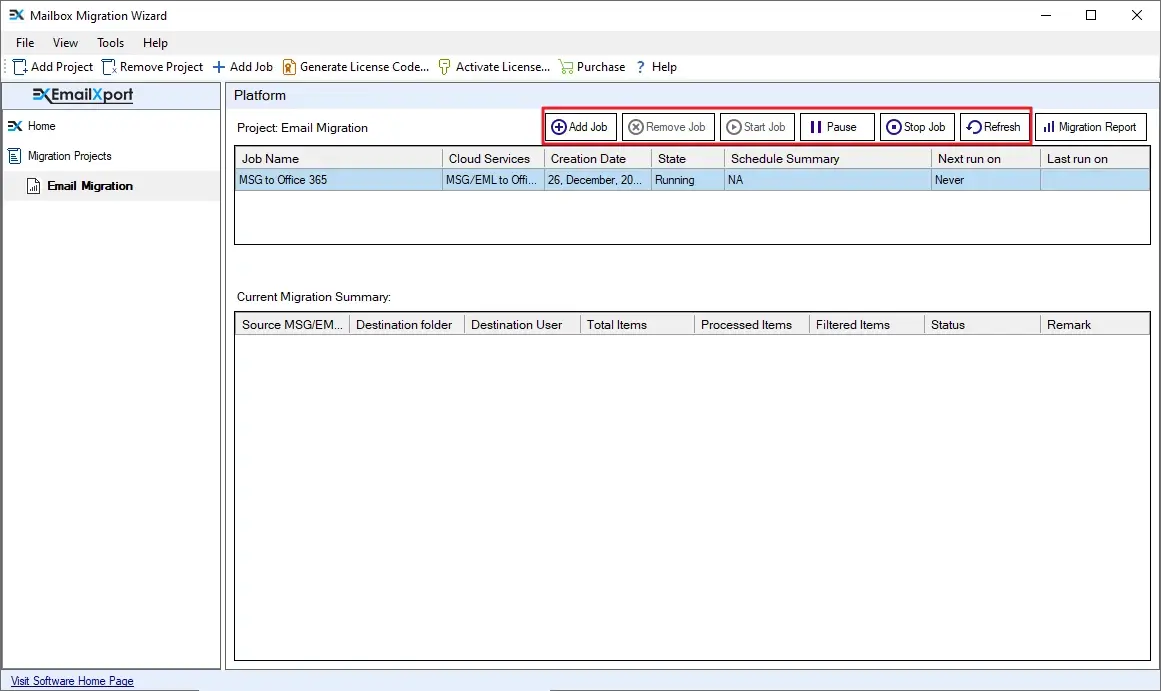
Note: The software allows you different options to control the migration:
- Add Job: Add a new email migration Job, between same or different endpoints.
- Remove Job: Remove any completed/stopped Job from the list.
- Start Job: Rerun the Job or continue after pausing it.
- Pause Job: Temporarily stop the migration without terminating it.
- Stop Job: Terminate a Job and end the migration instantly.
- Refresh: Refresh the migration status of the Job and data items.
Step 12: When the MSG to Office 365 migration is completed, the Job state will turn to Ready.
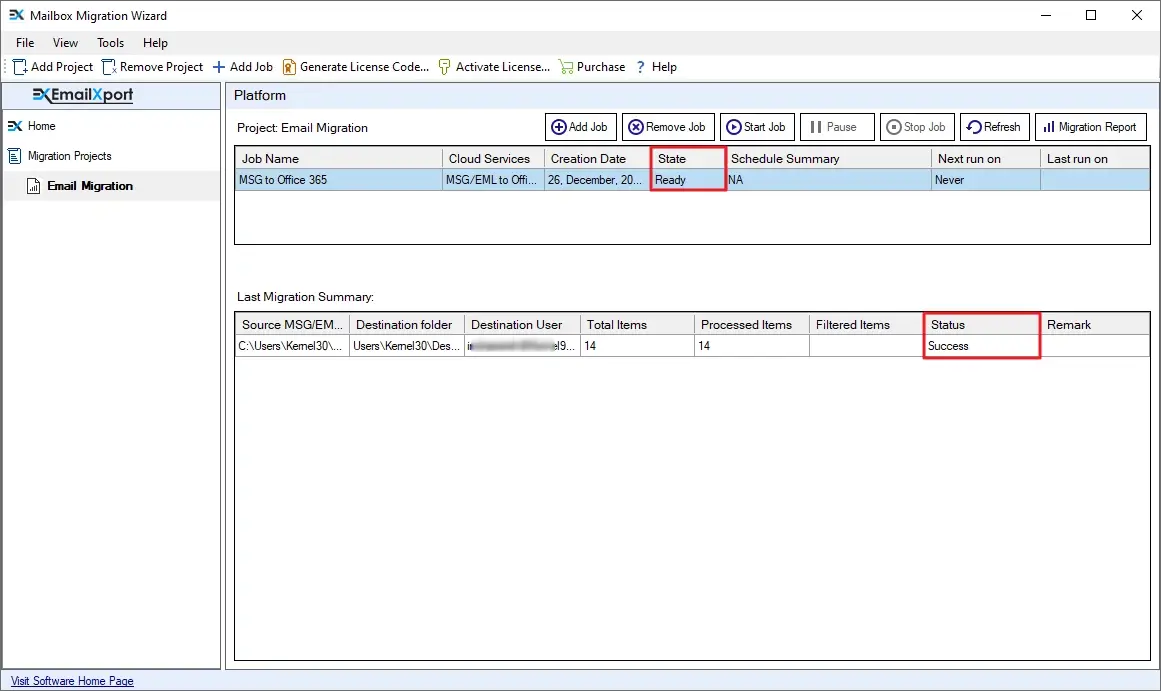
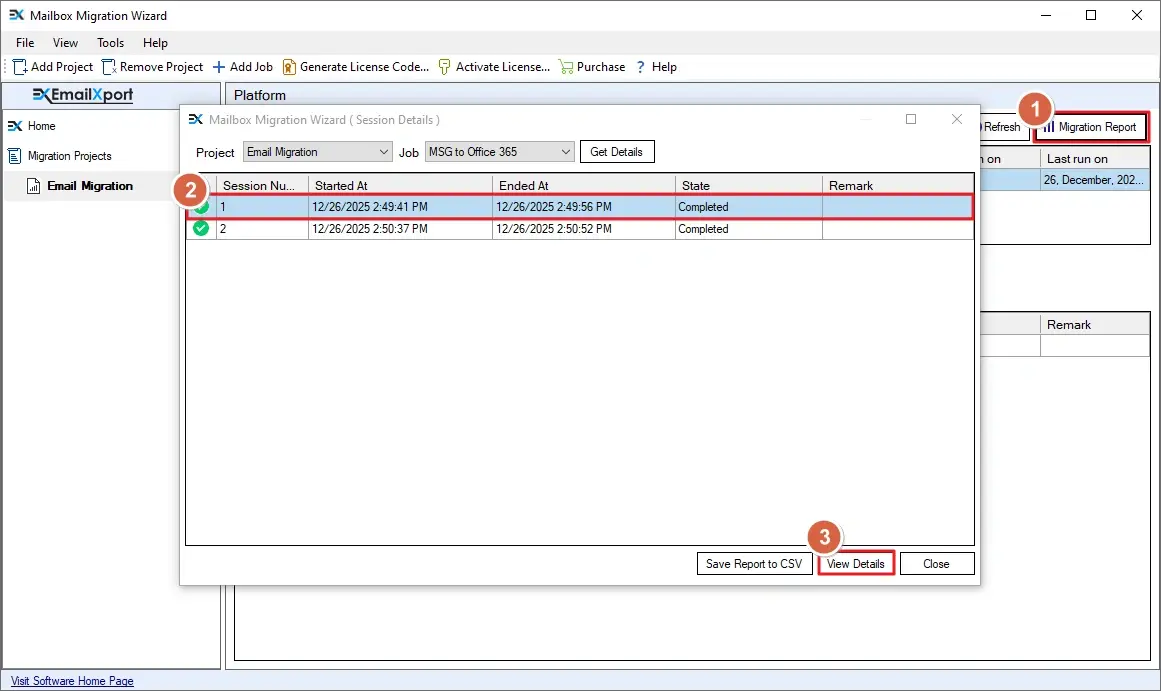
Step 13: To view the migration report, click the Migration Report button and select the Job. Then, click the View Details button.
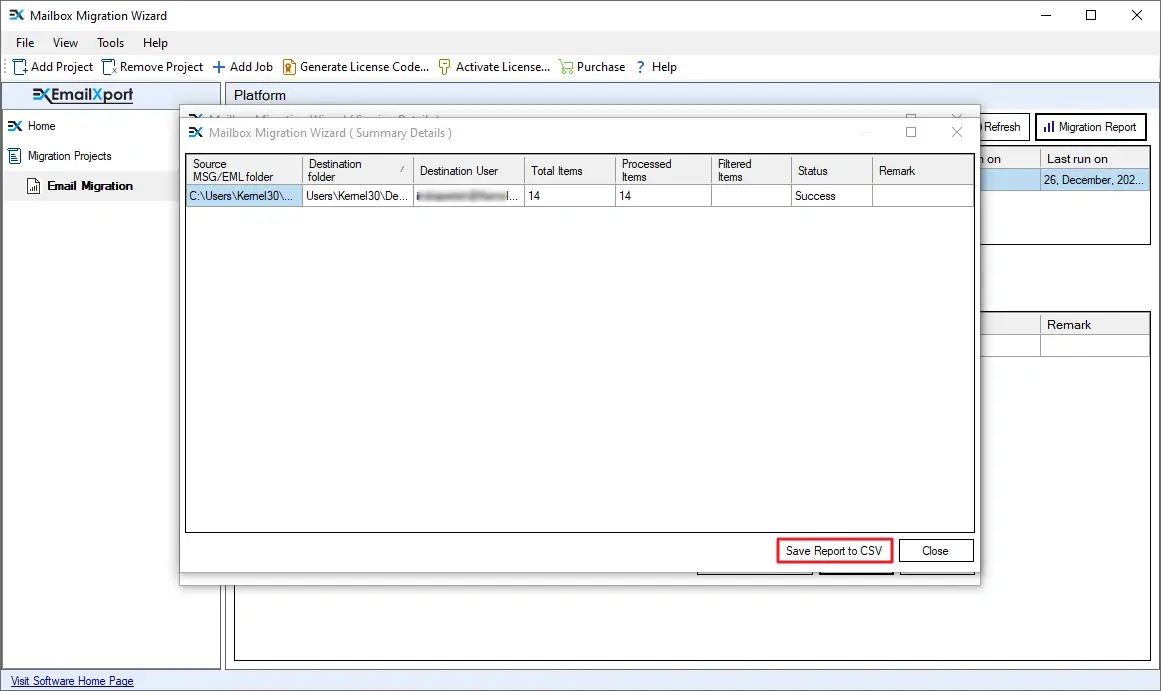
Step 14: To save the report to your local system, click on the Save Report option.
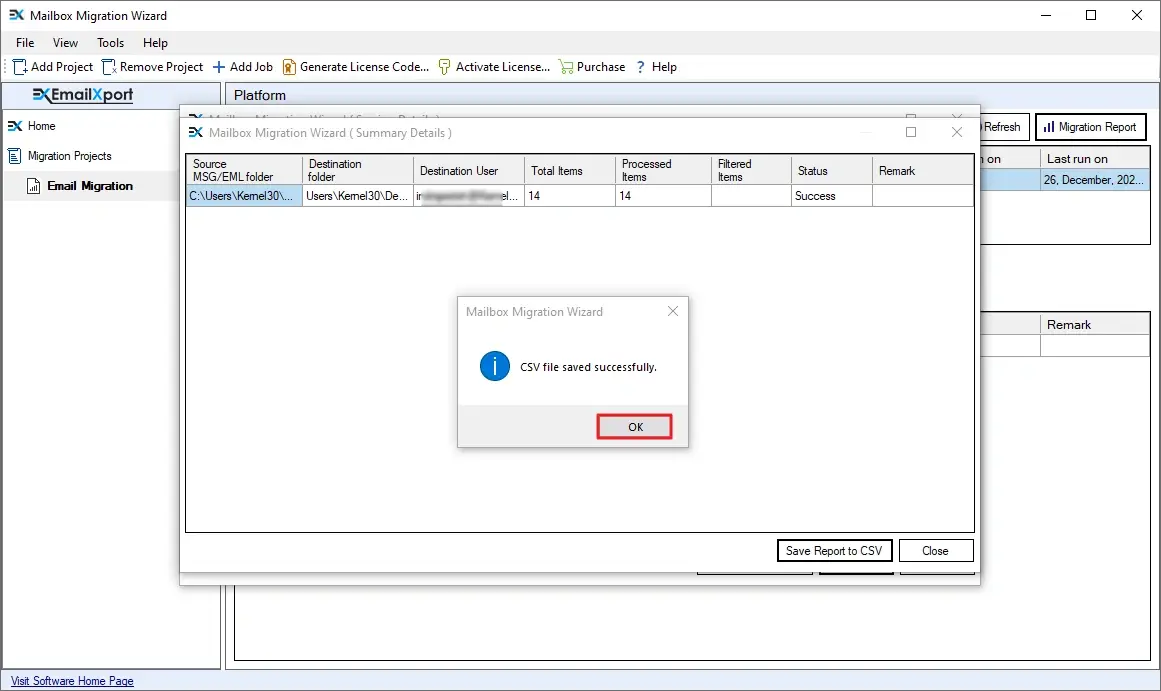
Step 15: Specify the location where you want to save the report. Give a file name and click Save.
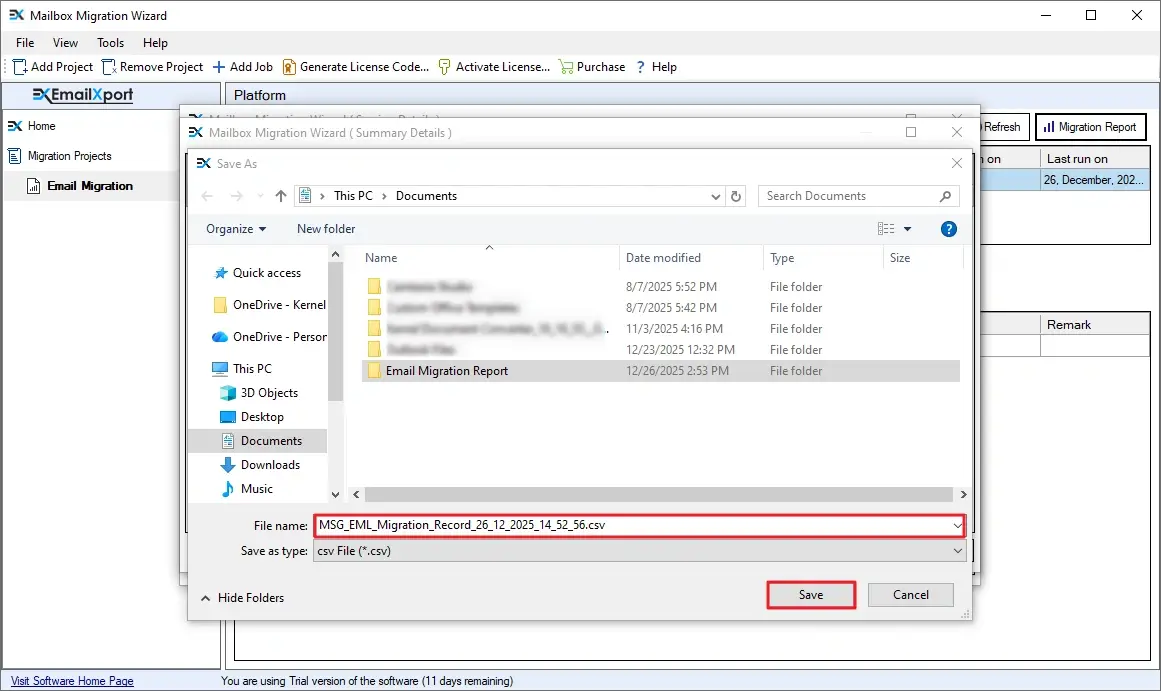
Step 16: A success message will be displayed when the report is saved. Click OK to close the dialog box.
Post Migration Tasks
After you have moved data successfully, perform these tasks to make sure you get no errors in future while accessing the emails.
- Validate Data Integrity: Go to the destination Office 365 account and check all the emails. Confirm that emails, attachments, and metadata (dates/senders) appear correctly.
- Check for Failed Items: Count and verify if the number of MSG files in the source is same as in the destination. If the count doesn’t match, find the missing item and migrate it. However, if you have used the MSG to Office 365 migration tool, you can simply check the migration report and rerun the migration with the Incremental feature.
- Check the Folder Hierarchy: You must manually confirm if all the folders are migrated while retaining the original folder structure.
- Secure the Emails: After the migration, apply the retention policies or archive policies as per your company's compliance needs.
Manual Method vs Automated Tool to Migrate MSG to Office 365
Check out the table to understand which approach you should take while importing MSG files to your Office 365 account.
| Features | Manually | EmailXport |
|---|---|---|
| Speed | Very Slow (Files process one by one) | High Speed (Batch processing) |
| Volume Limit | Often crashes when migrating multiple files at once | Easily handles unlimited file migration |
| Metadata | High chances of rewriting metadata like email received date | Preserves all original dates & email headers |
| Folder Structure | You have to manually create the folder structure | Retains the original source folder structure. |
| Failed Item Check | Have to check manually | Auto-generate a detailed CSV Report of success/failure |
Tips for a Faster MSG to Office 365 Migration
Use the following tips that migration experts use to minimize data transfer time and issues.
- Disable Antivirus Temporarily: Antivirus programs often do real-time data scanning. This can prevent the tool from reading and migrating MSG files. You should either whitelist the tool or pause scanning during the migration.
- Avoid Peak Hours: To make sure the user’s email interaction is flawless, the Microsoft 365 Server can pause or limit the migration. To maximize migration speed, schedule your migration (using our Schedule feature) for nights or weekends.
- Organize Source Data: If possible, group your MSG files into folders by Year or User. This makes mapping them to the correct Office 365 mailbox much easier.
Final Verdict
Move to Office 365 to enjoy the modern email feature, robust security, and reliability with high-availability servers. For a complete and error-free migration, use the strategy discussed above (pre & post) along with the recommended EmailXport MSG to Office 365 Migration tool to easily upload MSG files to Office 365 without data loss.
Frequently Asked Questions
Have any doubts about our tool? Resolve them with these most asked questions. If you can’t find the questions you are looking for here, contact us over the chat.
How can I import bulk MSG files to Office 365?
Here is the step-by-step guide to upload bulk MSG files to Office 365:
- Download, install, and launch EmailXport MSG to Office 365 Migration tool.
- Add the source folder containing MSG files and add an Office 365 account in destination.
- Map the source folders to desired O365 user mailbox and click Next.
- Apply filters and run your MSG to Office 365 Migration.
- After migrating your data, download a detailed migration report in a CSV file.
Do I need Outlook to move MSG?
No, our MSG to Office 365 Migration tool can migrate MSG files with or without Outlook application. Furthermore, all MSG files created on any version of Outlook are supported.
What will happen to my attachments during the MSG to Office 365 migration?
Each of the attachments in the MSG file is safely moved to the target Office 365 account. Be it any file (audio, video, image, document) of any file format, our tool can move it.
Can I maintain my local folder hierarchy when moving to Office 365?
Yes. Our MSG migration tool gives you multiple options to retain your original folder structure in the destination Office 365. Each of your folders will be migrated just like they were in the source.
If I migrate multiple times, will the MSG to Office 365 migration software create duplicate data?
You can migrate MSG to Office 365 as many times as you want without worrying about duplicate data. The tool provides you with an Incremental migration option. This option makes sure that if a file has already been moved, it is not uploaded a second time.
Can I filter which emails to migrate based on date?
Yes. Our MSG to Office 365 Migration tool allows you to choose a start and end date before beginning the migration. Only the emails falling between the specified dates will be migrated. This feature is especially useful when extracting files for data compliance needs.

Abhishek Pandey is a Senior Technical Content Writer with expertise in email migration, cloud migration, and enterprise software documentation. He creates simple and accurate technical content that helps IT professionals and end users handle complex email and cloud technologies with confidence.