
A PST file is a standard email file format used by Outlook since its beginning. It allows users to store a local copy of emails and other mailbox data on their system. You can use the PST file for backup, archiving, sharing, or for offline email access.
But since PST files are stored on your local system. To access the emails from the PST file, you either need Outlook or a PST viewer tool. Furthermore, you can only read emails from it if you are on the same system as the PST file itself. This limits the scope of your email access.
Microsoft solves this problem with its cloud infrastructure and its online email server, Exchange Online (also known as Office 365). It allows you to transfer PST to Office 365 and move all your offline email files to scalable cloud storage for high availability.
Moving further in this guide, you will get to know the simplest and best way to import PST to Office 365. We will help you overcome the single-device email access limit and shift to the cloud for anytime access on any device (computer, mobile, tablet, web).
What are the Reasons to Import PST to Office 365?
There are several reasons that can compel users to migrate PST to Office 365, a few of them are:
- Enhanced Security: Antivirus on your system is the only layer between virus and PST file on your local system. But, when you import PST file in Office 365, you get enterprise-grade security. And features like 2FA to prevent unauthorized data access.
- Device Independence: Relying on the PST file means limiting yourself to only a single device. Move to Microsoft cloud and experience multi-device email access with Office 365. Read and compose emails from a computer, laptop, mobile, or tablet, as per your requirement.
- Prevent Corruption: The PST files are known to break when they cross the 50GB capacity. Cloud has no such size limitations. By migrating PST files to Office 365, you get unlimited (scalable) storage as per your requirement.
- Simplified Email Management: All your emails are present in a centralized location. This makes email searching and sharing easy. It also becomes easy to control the mailbox in scenarios when an employee joins your organization or leaves it.
- Artificial Intelligence: Microsoft has integrated AI (Copilot) into Office 365. Organizations or individual users want to import PST file to Office 365 and leverage this new advanced automation tool’s power to optimize their workload.
- Help with Legal Requirements: In Office 365, you get features like eDiscovery. Such features help to filter out and export specific emails for compliance needs. Organizations and IT professionals rely on them to quickly answer legal requests.
Major Difference | PST File vs Office 365
Check out the top differences between your offline PST file and online cloud server (Office 365.)
| Parameter | PST | Office 365 |
|---|---|---|
| Storage Location | Stored locally on your system | Uses high-availability servers for storing mailbox data |
| Data Accessibility | Low accessibility due to local system storage | High availability, anytime data access from any device |
| Security | Limited to your OS or third-party antivirus program | You get enterprise-grade multi-layer security |
| Reliability | Mailbox data can get lost/corrupt while moving or archiving | 100% data availability with multiple copies on different server |
| Backup | You must manually backup PST file data | Automatic backups are run periodically |
| Capacity | Recommended to keep it less than 50GB | No limit, you can scale up/down storage as per your requirement |
How to Import PST File to Office 365 Successfully?
The fundamental difference between the offline PST file and Microsoft cloud makes it challenging to transfer PST to Office 365. Many users struggle when migrating PST files to Office 365. Common issues they face are slow migration speed, incomplete data, unsupported paths, file access-level, migration throttling issues, etc. To avoid these issues and achieve an error-free email import, you must follow a data transfer strategy. A reliable data transfer structure, followed by admins is:
- Inspect and Backup PST Files: Start by gathering all your PSTs into a single location. This is important because importing PST files from different locations (multiple machines, NAS, etc.) is hard. Furthermore, make sure every PST file is backed up safely to prevent permanent data loss.
- Delete Unwanted Data: Go through the PST files and review the data. Remove any unwanted emails or folders before we begin to move PST to Office 365. This helps to prevent migration of obsolete data and also reduces the migration time.
- Repair Corrupt PST files: If any of the PST files are damaged, repair them with ScanPST.exe or with a dedicated PST repair tool. Additionally, make sure to remove passwords from your PST before you begin to import PST to O365. Otherwise, you may have accessibility issues after migration.
- Setup the Target Account: Buy an appropriate Office 365 subscription with enough storage to move all the new PST files. Also, make sure you have all the required permissions that are needed to import the emails, such as the Mailbox Import Export role.
- Create New User Mailboxes: If you want to move the PST files to different mailboxes, then create them in the destination account. Give them unique names; this helps in mailbox identification during the mailbox mapping.
- Choose a Migration Time: For fast migration, choose a time when the server load is minimum. Prefer non-office hours or weekends for migration. This helps to prevent service throttling (built-in Exchange Server feature) and minimize the risk of slow data transfer.
Manual vs Automated Method to Import PST File to Office 365
Your migration success also depends upon the approach you take. To help you pick the best method to import PST to O365, check out this table:
| Parameter | Using the AZ Tool | Drive Shipping | Migration Tool |
|---|---|---|---|
| Speed | Moderate | Slow (takes multiple days at least) | Fast |
| Easy to Use | Technically Challenging | Require heavy effort | GUI based application with easy UI |
| Automated | Requires manual effort | No, you have to physically ship the drive | Complete migration can be automated |
| Large File Migration | Not recommend | Yes | Yes |
| Use When | When you need to move less then 500GB data | For large mailbox data transfer | All data size supported (small or massive) |
Automated PST to Office 365 Migration Tool
It is clear from the above table that to effortlessly migrate PST to Office 365 account, you must use a dedicated tool. The EmailXport Mailbox Migration software is designed and developed by highly skilled engineers who have complete domain and architecture knowledge of Office 365. You can add PST file created on any Outlook and import PST to O365 account on any tenant with this tool. Along with the original email message, the tool also retains the metadata, like Read/Unread status, email signature, timestamps, etc.
Furthermore, the tool offers several advanced features to help with quick and accurate PST file migration, like:
- Easily move your complete mailbox data, like emails, contacts, calendars, attachments, and folders (Inbox, Sent Items, and other folders).
- Migrate multiple PST files in a single operation to the same or different user mailboxes.
- The tool makes sure to preserve your default and custom-made folder structure with the same name.
- Automatic user mapping using a CSV file, along with the option to manually map each source mailbox to a destination mailbox.
- Import Outlook PST to Office 365 unlimited times with zero data duplication using the Incremental migration option.
- Built-in filters like date range, include/exclude folders, skip empty folders, etc., for selective and fast migration.
- Offers a free trial version for download. You can move 50 items per folder for free for a period of 15 days.
Get the free trial version of PST to Office 365 Migration software to move 50 items per folder. Download Now!
How to import PST to Office 365? (Quick Steps Guide)
Follow this step-by-step guide to migrate PST file to Office 365 using our advanced solution:
Step 1: Download and install the PST to Office 365 Migration tool.
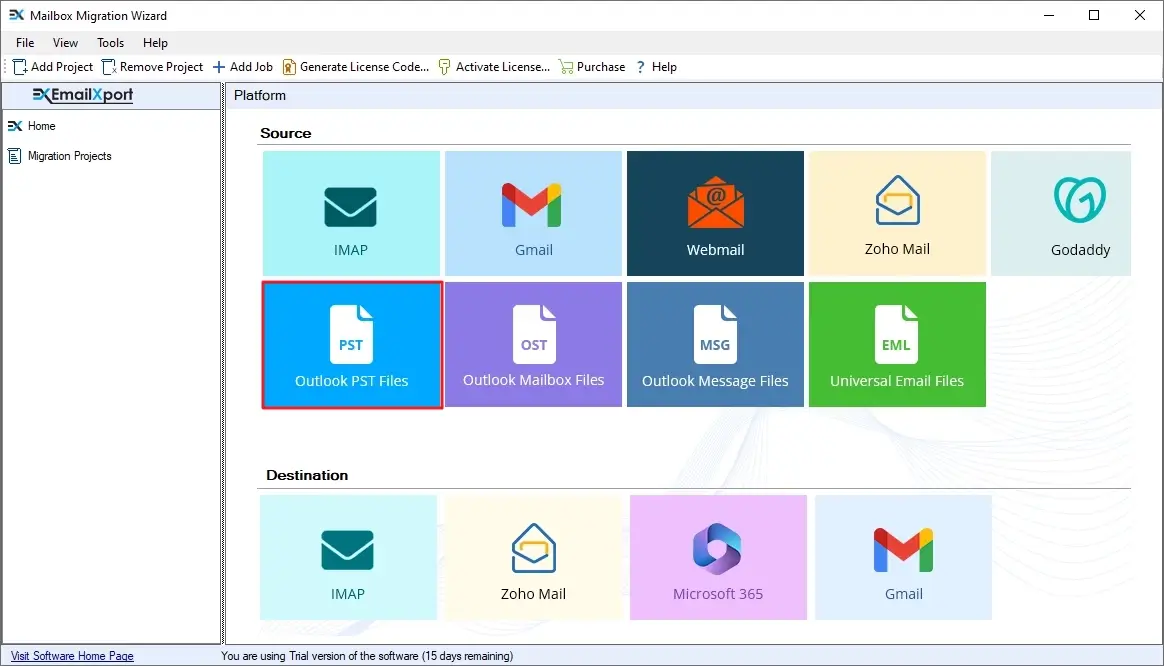
Step 2: Launch the tool and click on the PST (Outlook PST Files) tile.
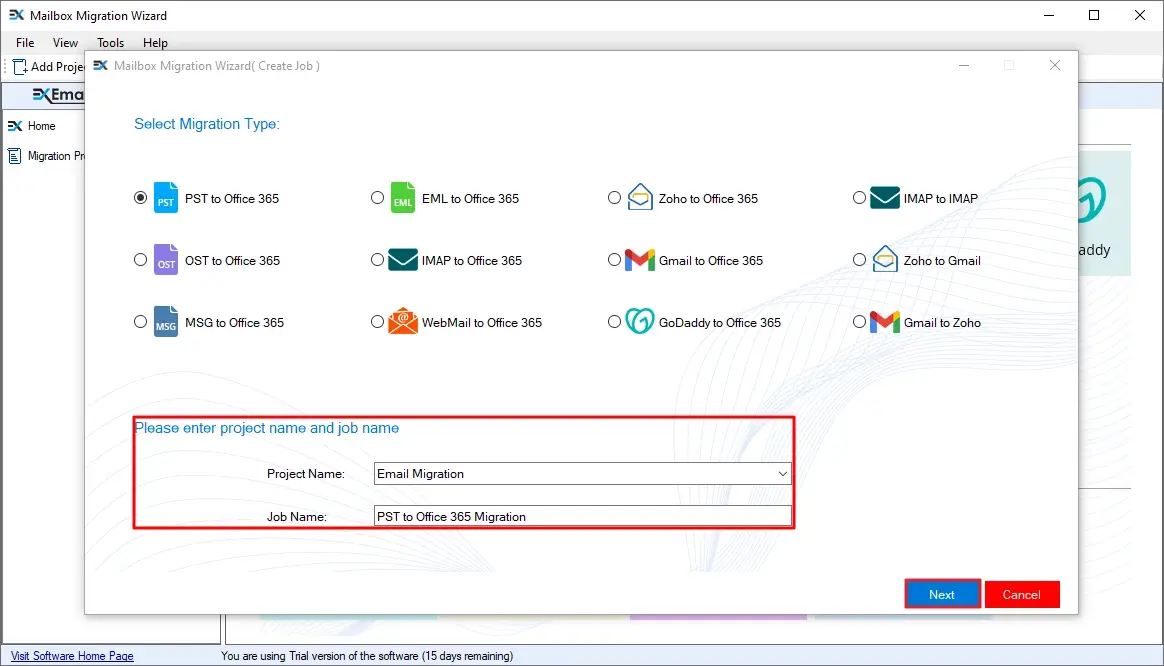
Step 3: Select PST to Office 365 option. Then give a Project Name, Job Name, and click Next.
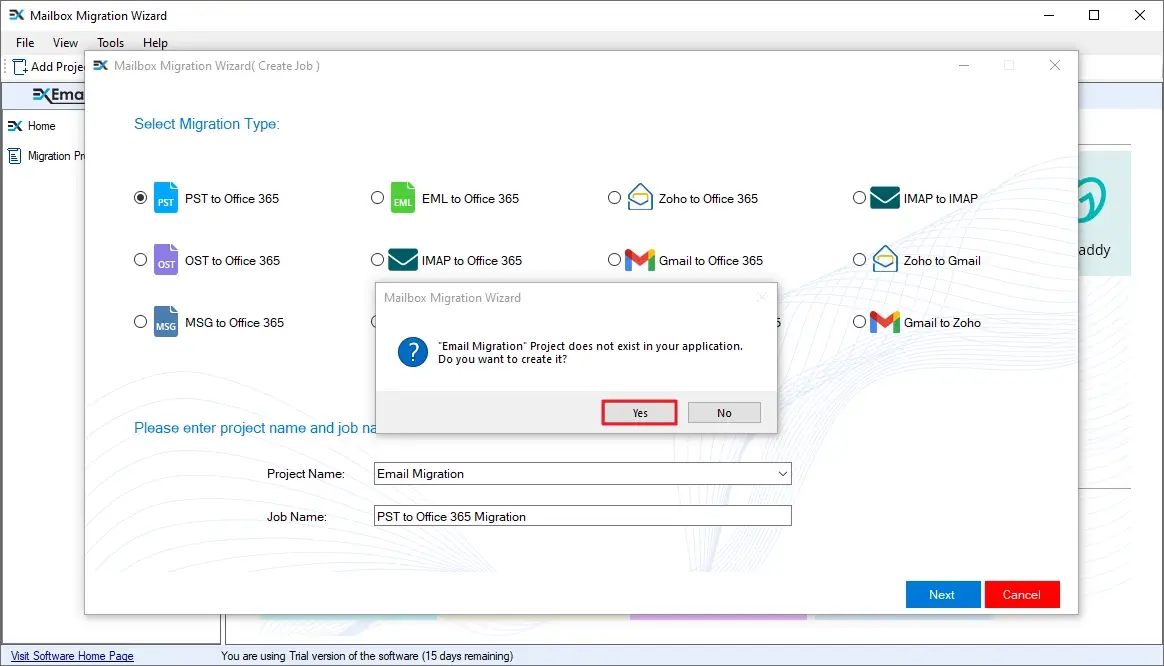
Step 4: The tool will ask to create the Project (if it's a fresh project). Click Yes to create a Project and Job.
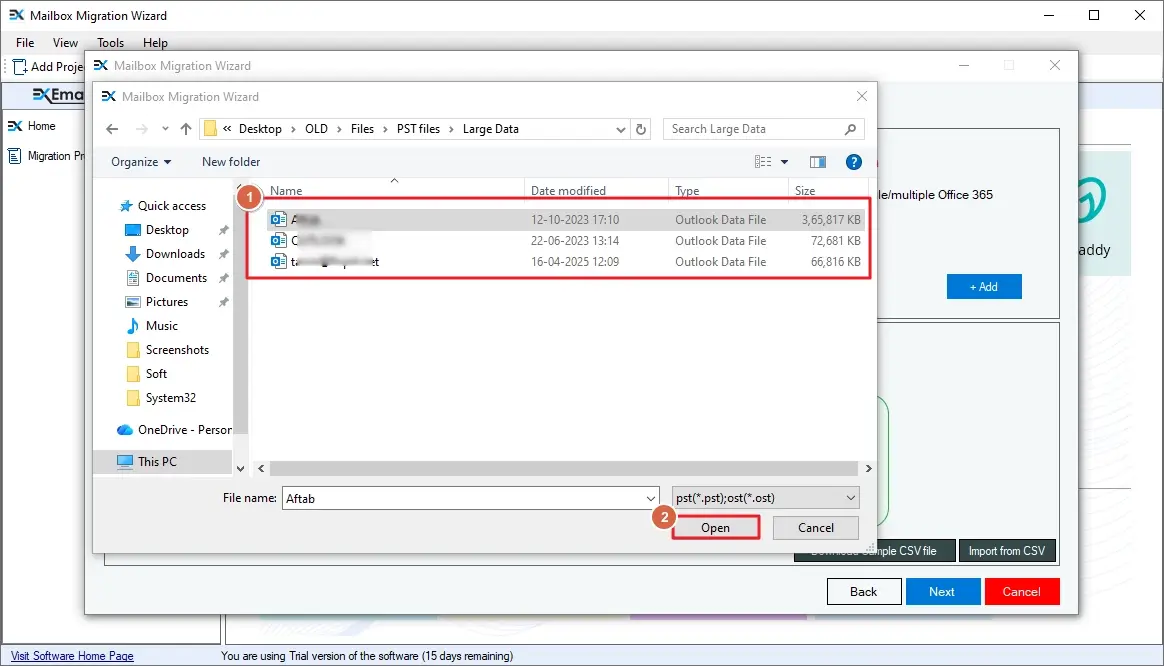
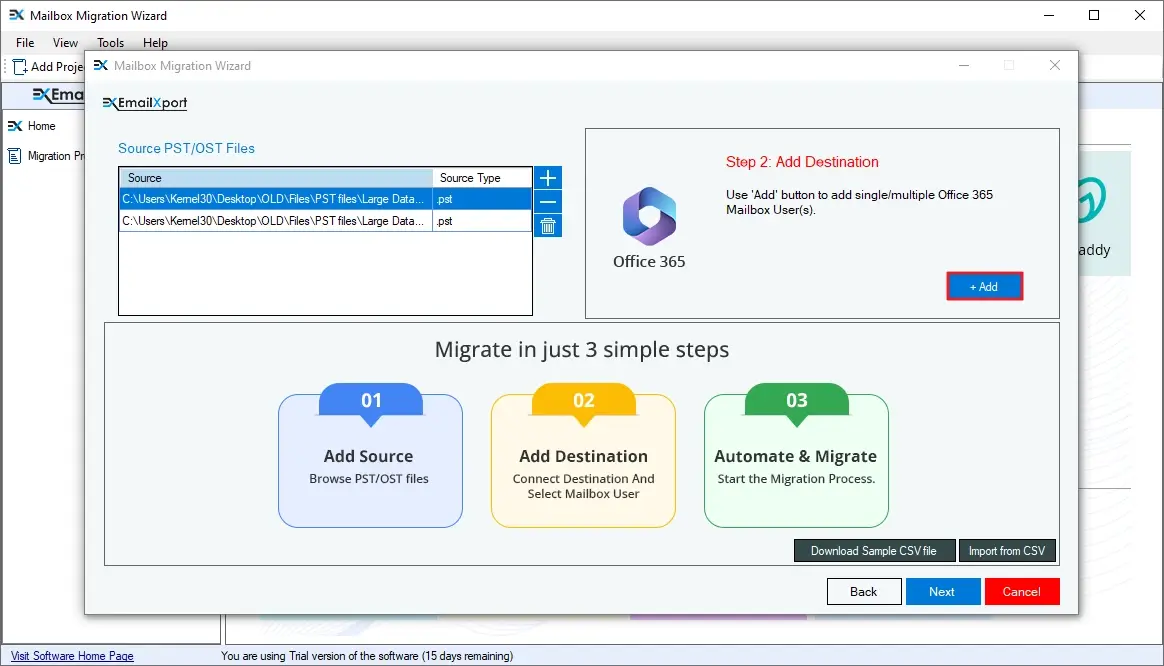
Step 5: Click on the Add button in the Step 1: Add Source tile.
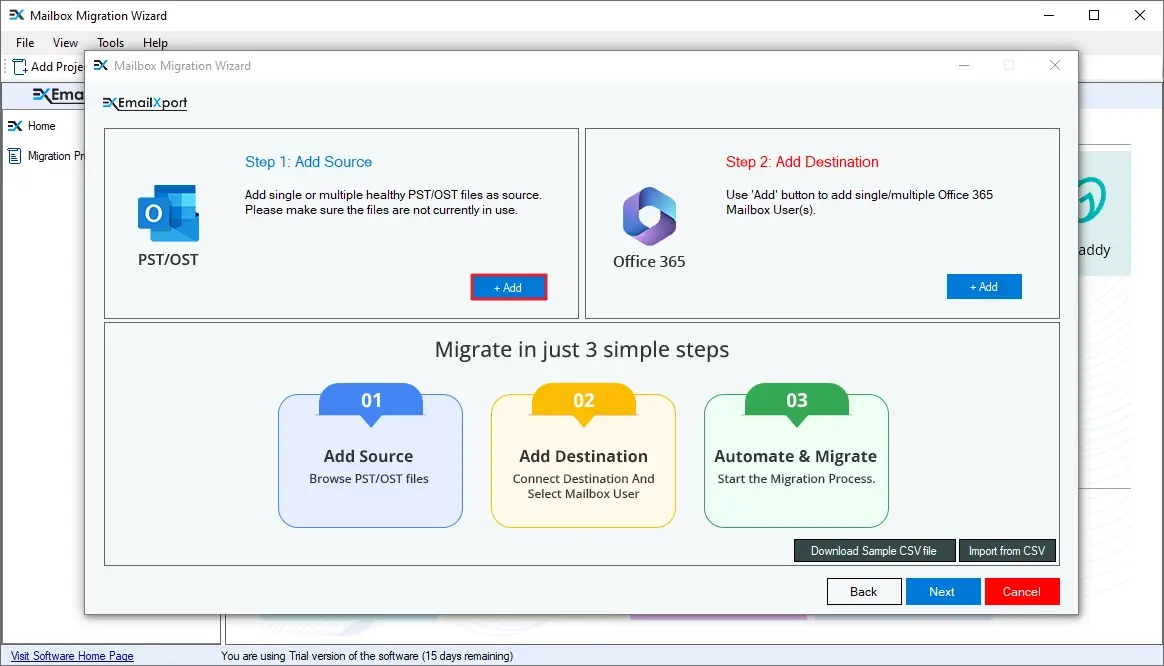
Step 6: Select the source PST file (single or multiple) from your system and click Open.
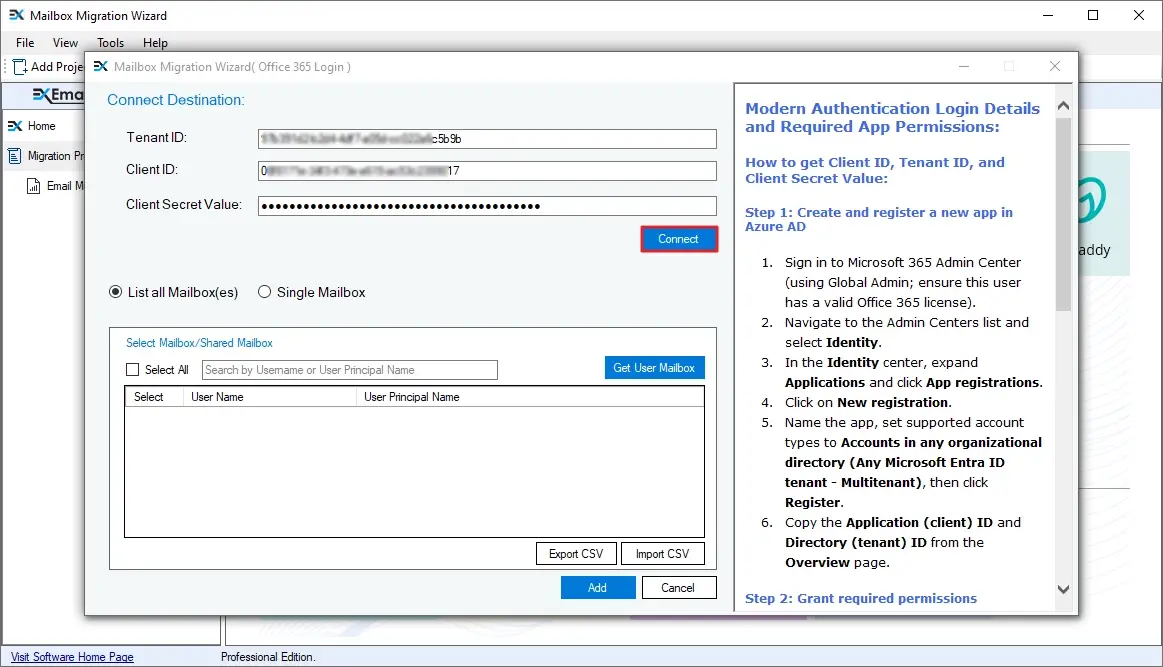
Step 7: To add a destination, click on the Add button in the Step 2: Add Destination tile.
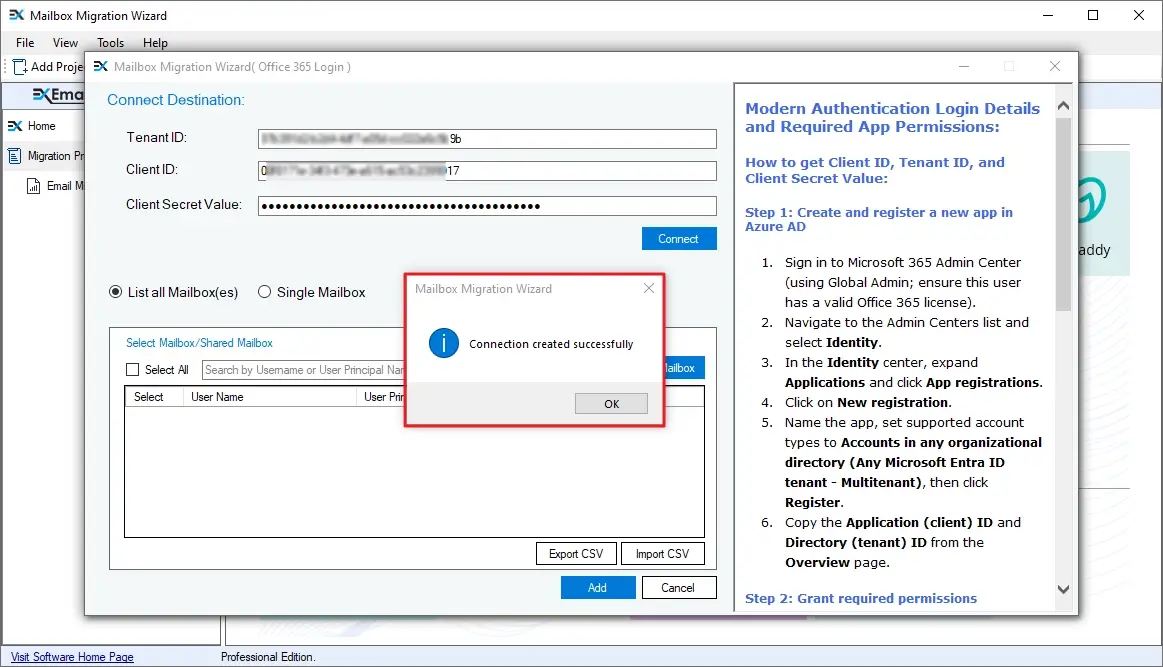
Step 8: In the Connect Destination window, enter the Tenant ID, Client ID, and Client Secret of the target Office 365 account and click Connect.
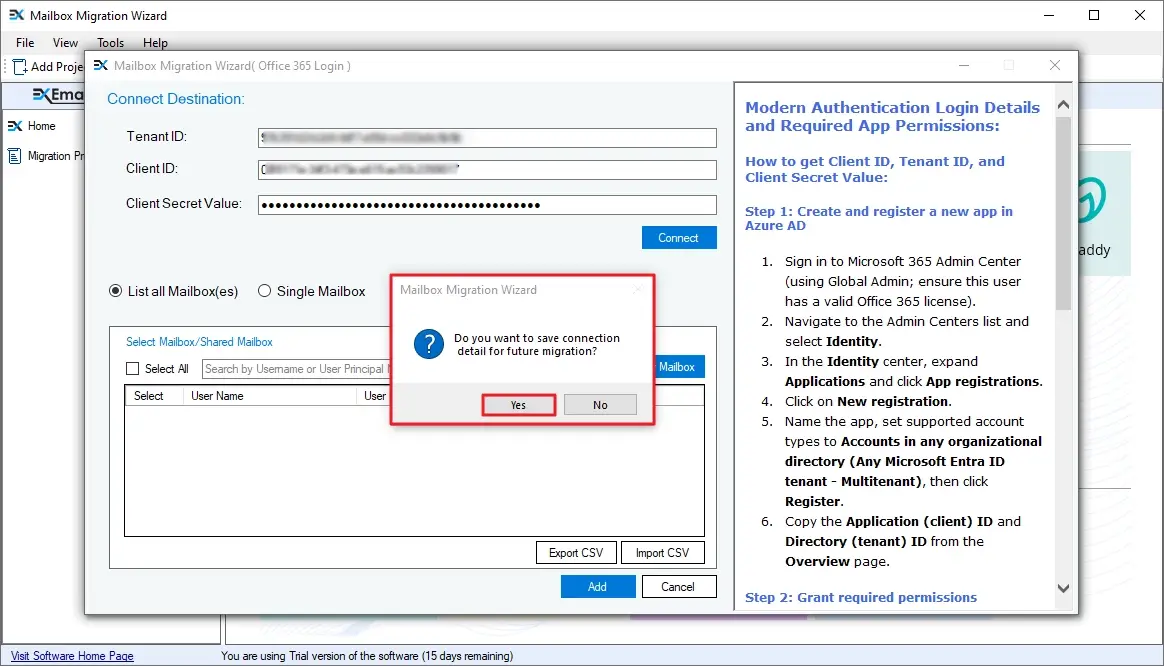
Step 9: When the tool is successfully connected to the destination Office 365 account, you will get the “Connection created successfully” message. Click OK to continue.
Step 10: The tool will also ask you to save the Office 365 credentials for future migration. Click Yes to save or No to skip saving.
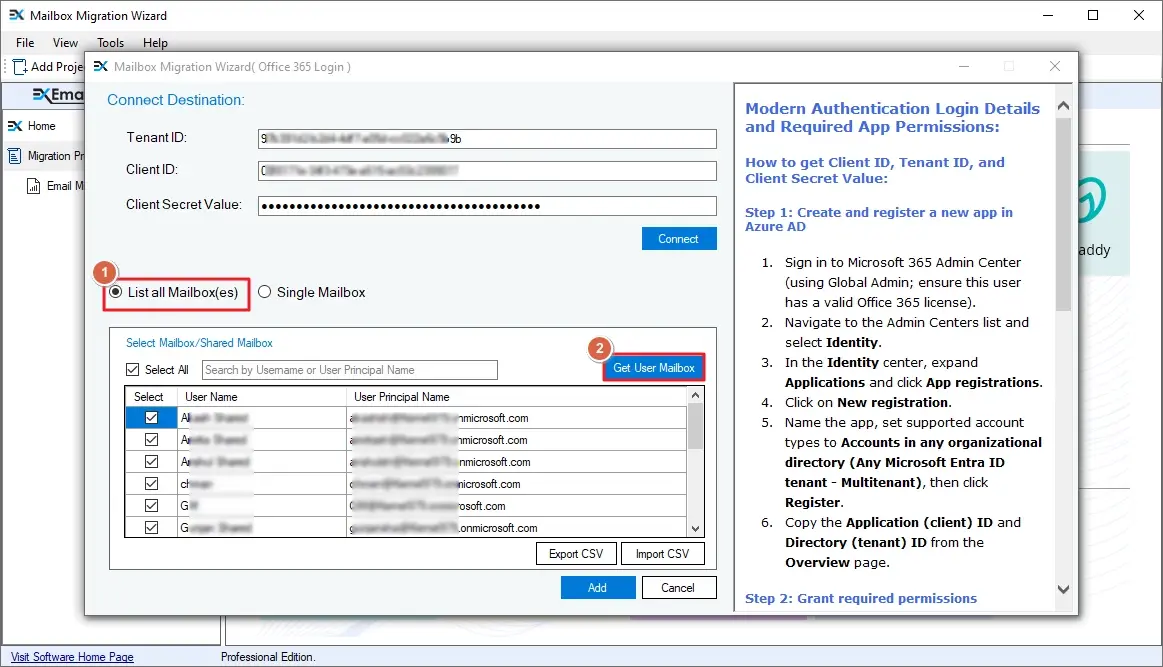
Step 11: Select the List all Mailbox(es) option and click the Get User Mailboxes button. The tool will list all the user mailboxes from the Office 365 account.
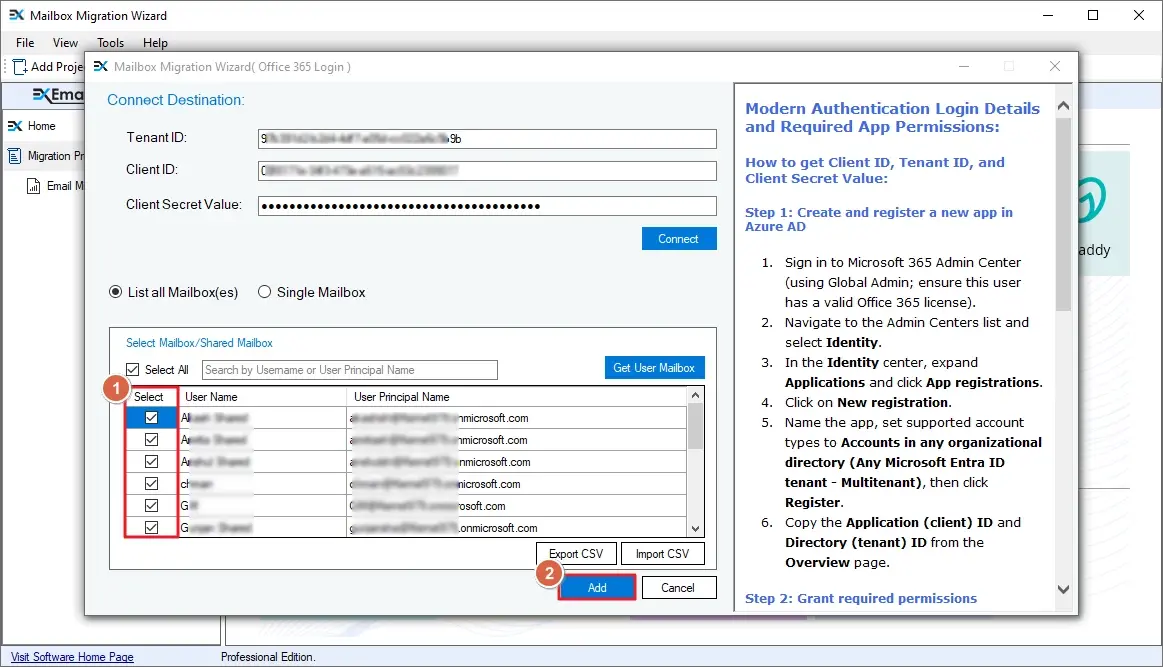
Step 12: When you get the list of all the mailboxes, select the target user mailboxes and click Add. To quickly find a specific mailbox from the list, use the search bar.
Note: If you already have a CSV file with the target user's mailbox list, upload it using the Import CSV button. If running the migration for the first time, use the Export CSV button to save the list for future migrations.
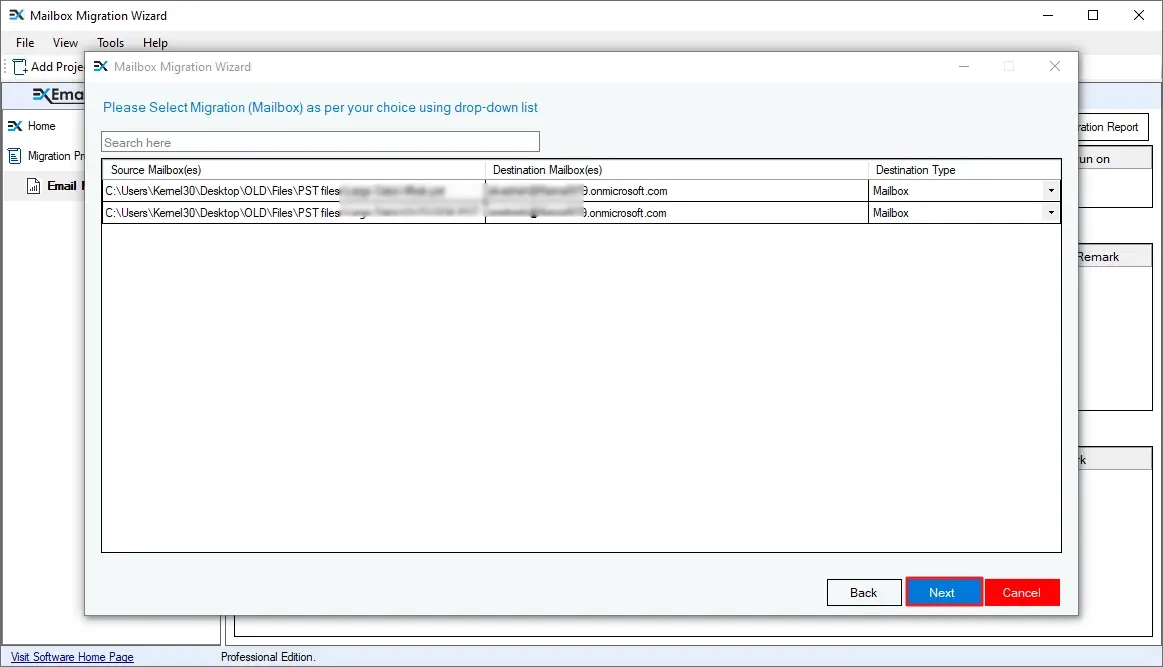
Step 13: Map the source PST file to the destination mailbox. You can manually map the mailboxes or import a CSV file for automatic mailbox mapping. Click Next to continue.
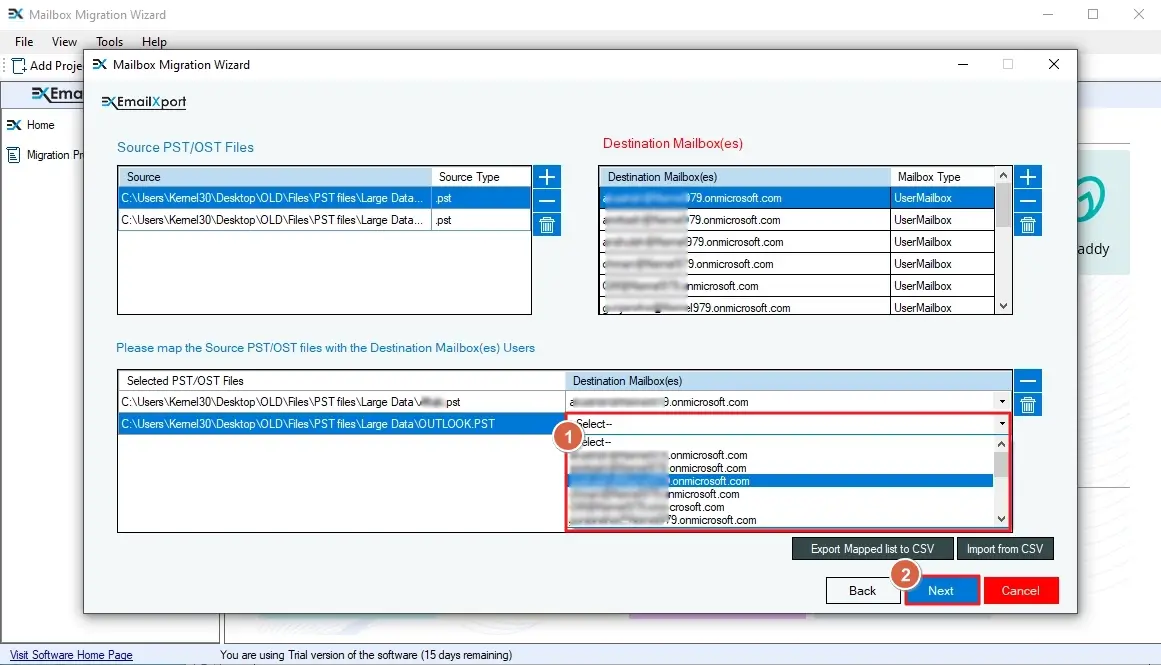
Step 14: Select the migration destination and click Next.
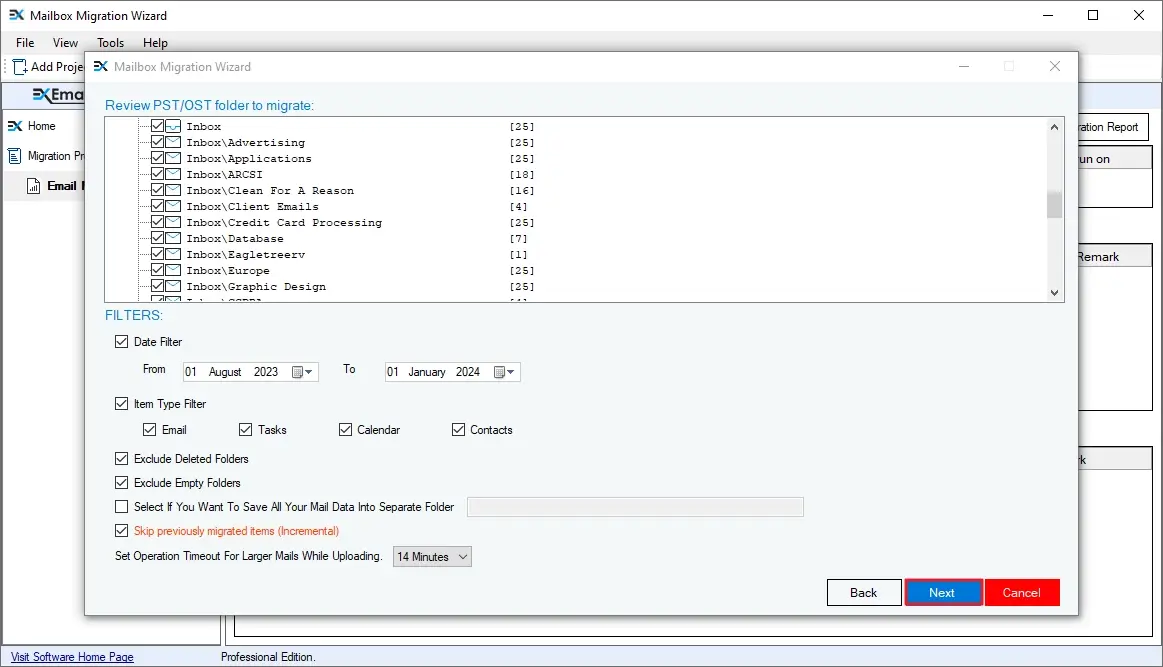
Step 15: To import PST to Microsoft 365 with selective data only, use these filters:
- Review PST/OST folder to migrate: Choose the necessary folders from the source PST files.
- Date Filter: Specify a From and To date to migrate mailbox data between specific dates.
- Item Type Filter: Use this option to move only Email, Tasks, Calendar, or Contacts.
- Exclude Deleted Folders: Skip all the deleted folders from migration.
- Exclude Empty Folders: Skip all the empty folders from migration.
- Select If You Want To Save All Your Mail Data into Separate Folder: Use this option to save the PST file data in a specific folder in the Office 365 account.
- Skip previously migrated items (Incremental): Select this filter to move only newly added or updated files from PST to Office 365.
- Set Operation Timeout for Larger Mails While Uploading: Choose a time limit. If any email takes longer than the selected limit, it will be skipped.
Finally, after applying all the filter options, click Next.
Step 16: Select Execute Immediate and click Finish to begin transfer PST to Office 365 Job.
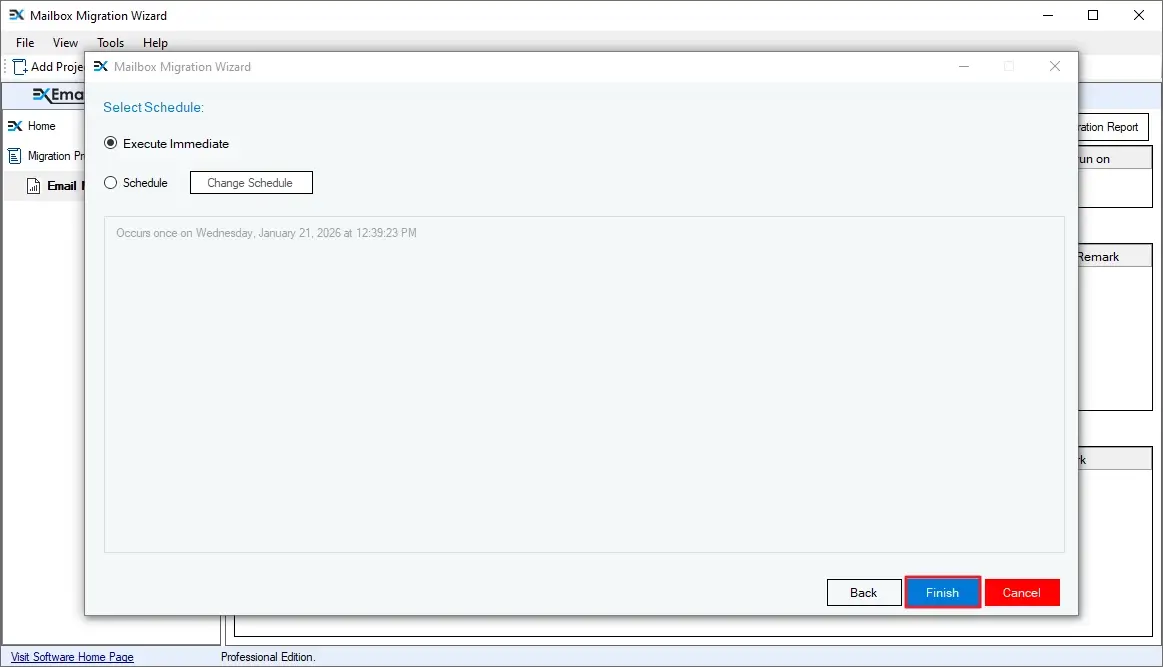
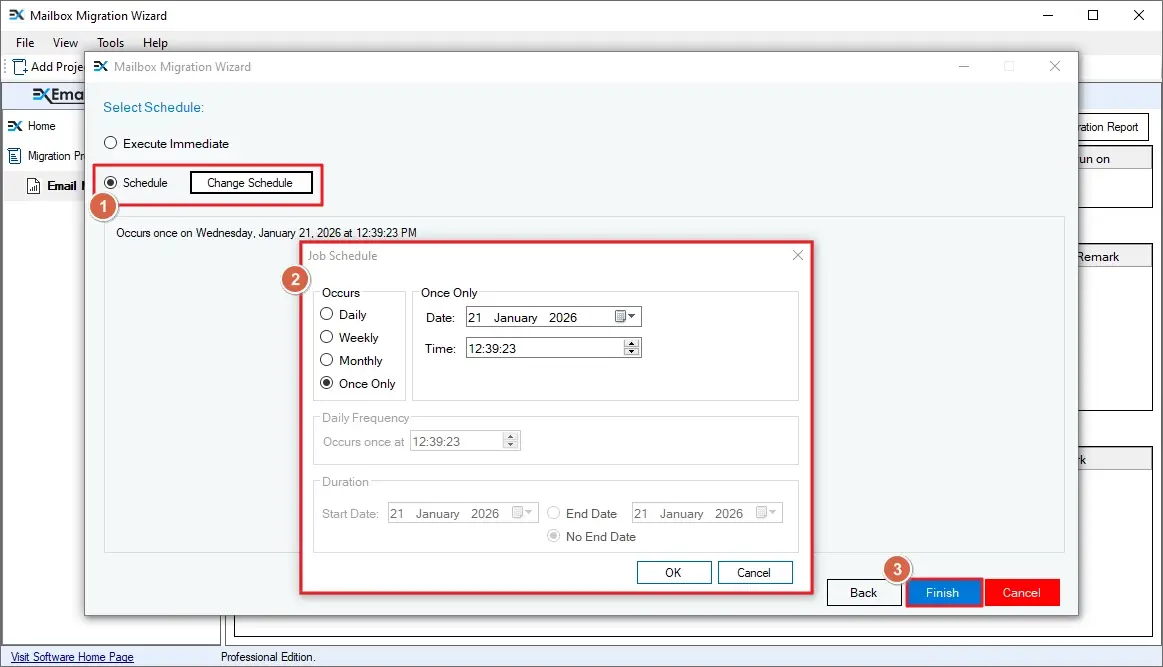
Note: To automate the migration, select Schedule, click on the Change Schedule, and configure the date, time, and occurrence.
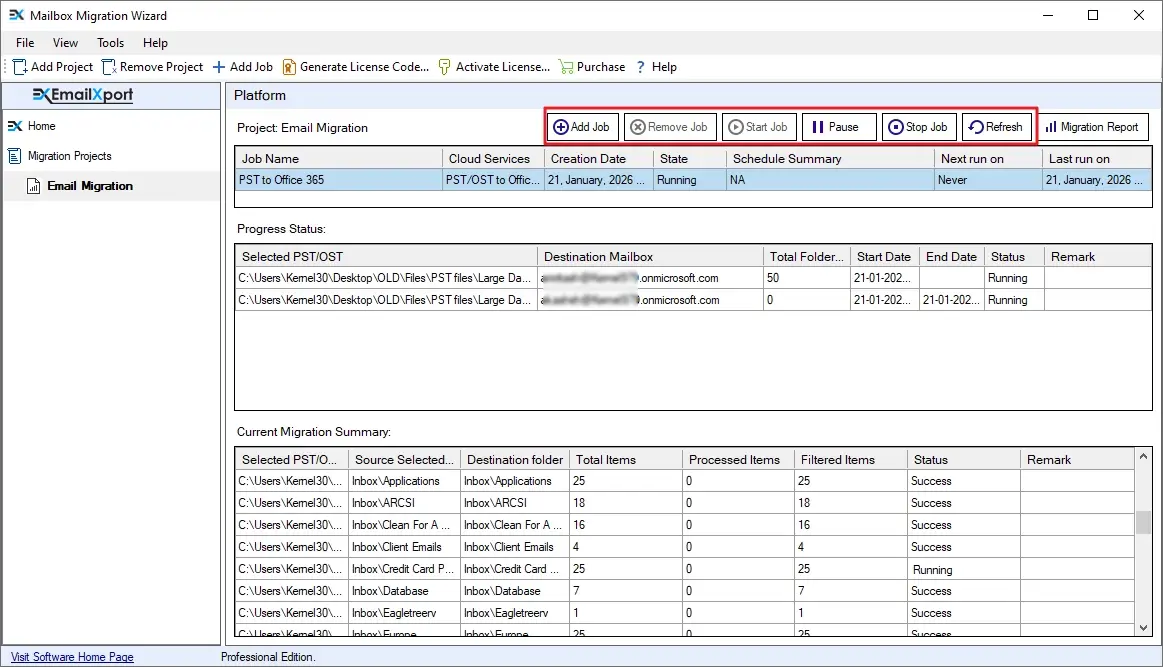
Step 17: The tool started migrating PST files to Office 365. The software will show the Job status as Running.
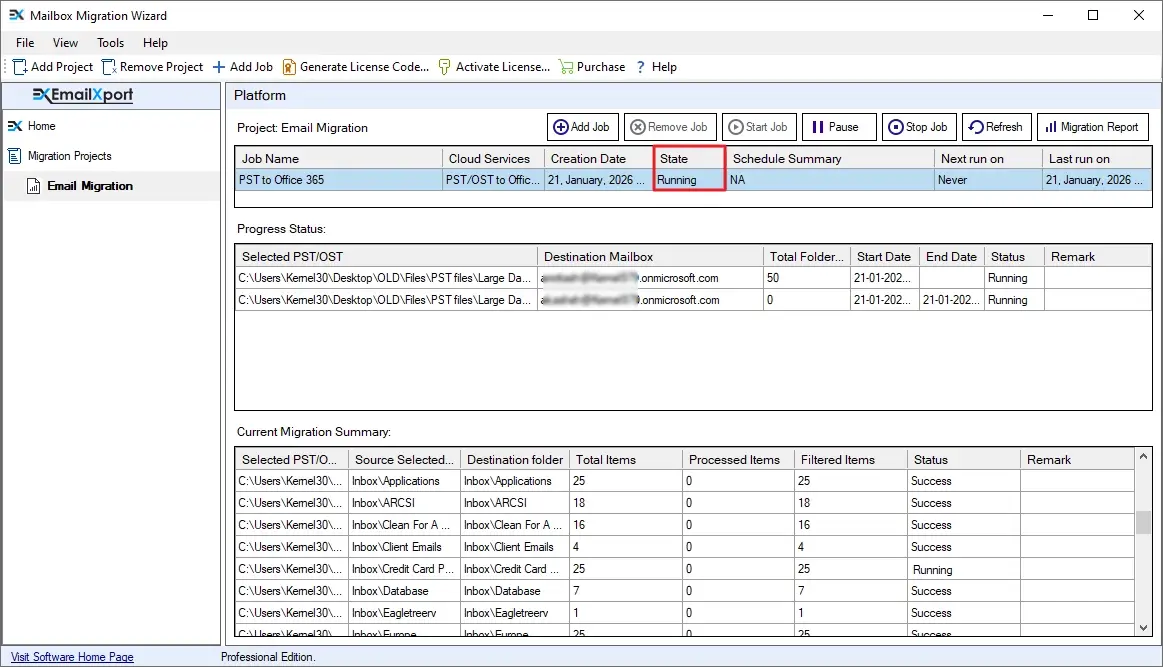
Note: You can control the migration with the following options:
- Add Job: Add a new Job to the current project.
- Remove Job: Remove the selected Job (completed/stopped) from the project.
- Start Job: Start/resume a paused or stopped Job.
- Pause: Pause the selected Job.
- Stop Job: Terminate any Job.
- Refresh: Update the migration statistics.
Step 18: After a successful import PST file in Office 365 operation, the Job status will turn to Ready status.

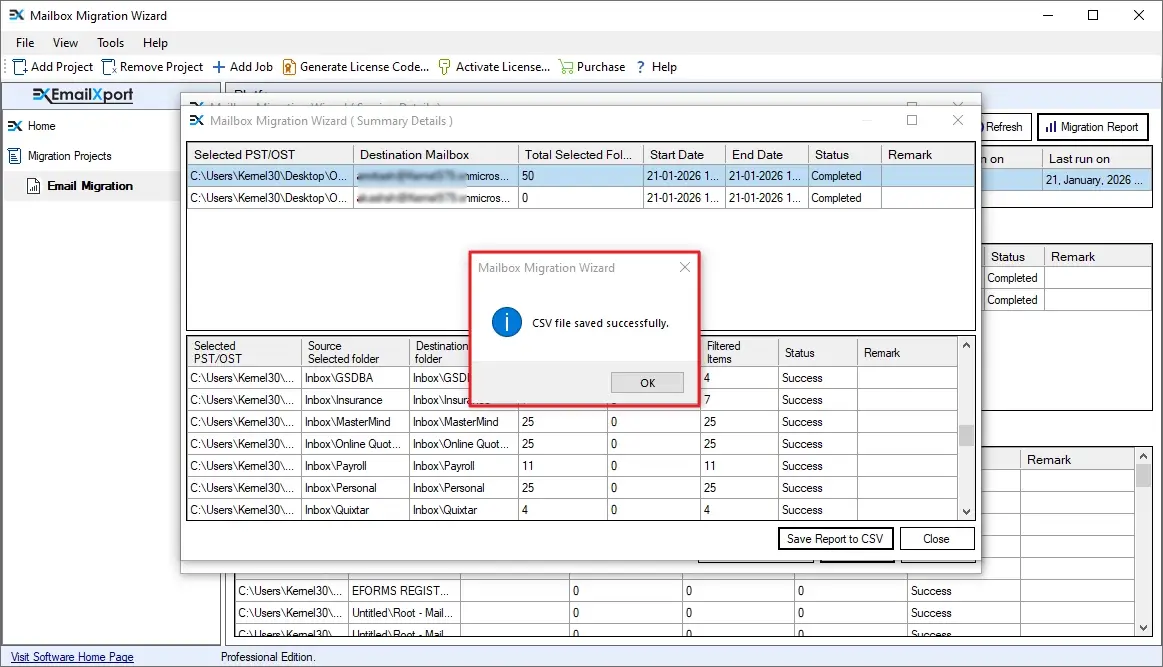
Step 19: To view the migration summary, click on the Migration Report. Select the Job and click View Details to view the detailed report.
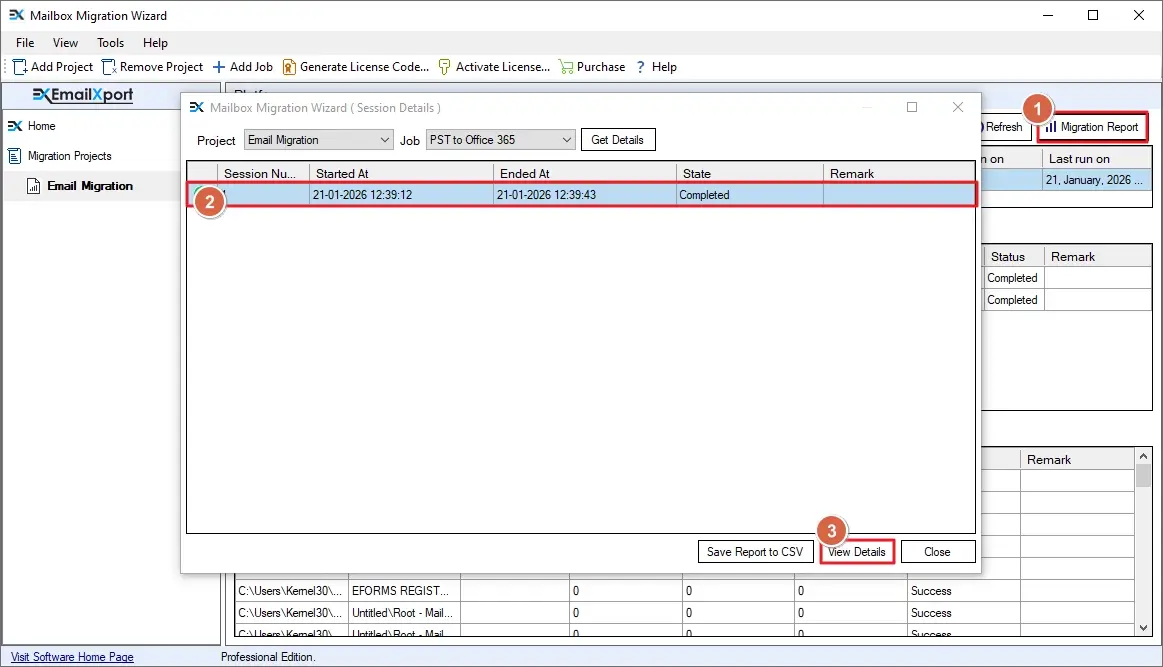
Step 20: Click on the report to get a detailed view. To save the report, select it, and click Save Report to CSV button.
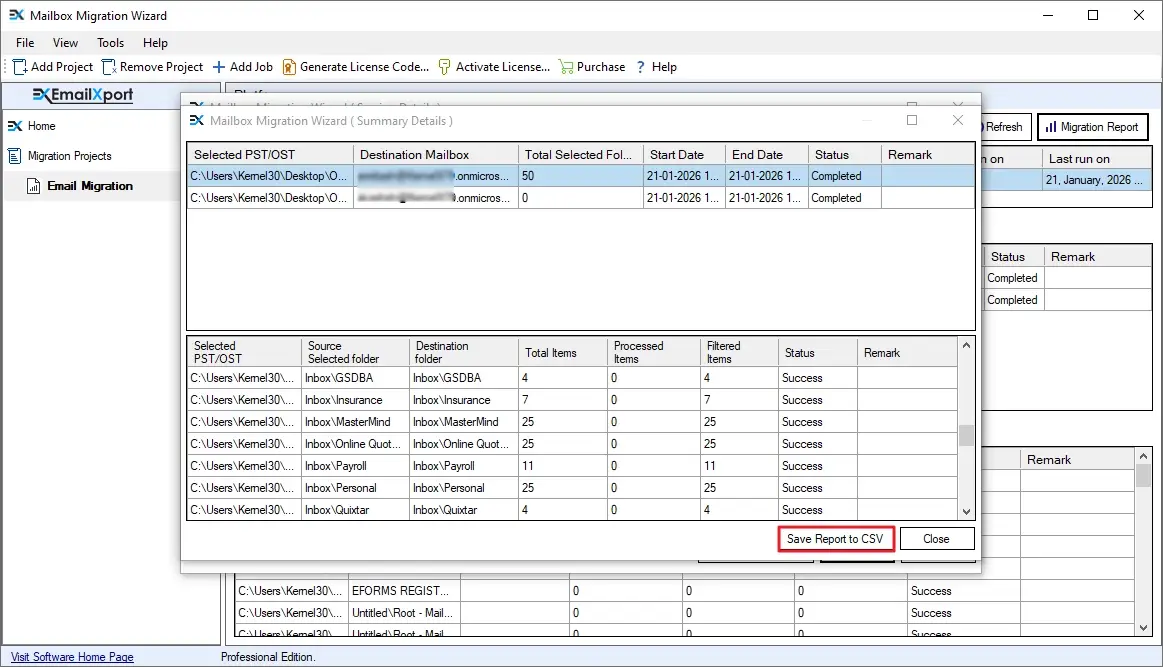
Step 21: Specify the location where you want to save the report. Give a name to the report or leave the default name and click Save.
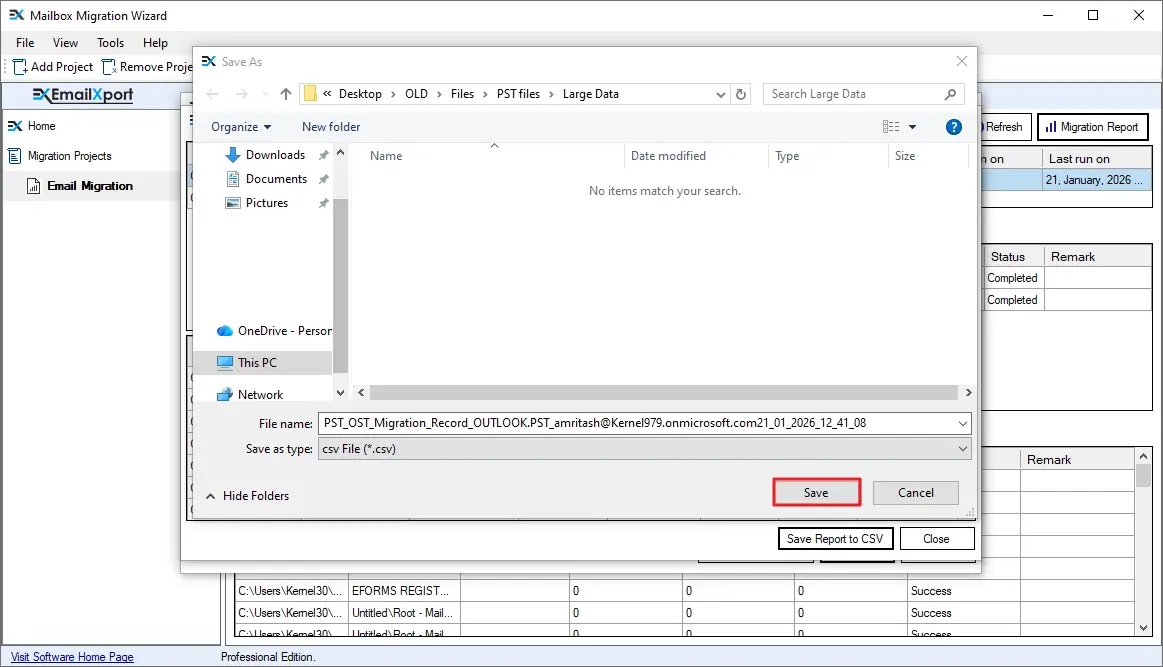
Step 22: When the report is saved, you will get the “CSV file saved successfully” message. Click OK to close the pop-up.
Conclusion
Import PST to Office 365 and experience robust security and anytime mailbox access with the AI-powered Microsoft environment. Use the EmailXport PST to Office 365 Migration tool to automate the complete mailbox transfer process and eliminate any risk of data loss or file damage. It is a professional tool developed to help organizations (large, medium, or small), and individuals to simplify email migration.
Frequently Asked Questions
If you have any doubts about our import PST file to Office 365 software, check out the questions below.
Can the tool bulk import PST to Office 365 account?
Yes. Use the following steps to migrate PST to Office 365:
- Download, install, and open EmailXport PST to Office 365 Migration tool.
- Add source PST files (as many as you want) and destination Office 365 account.
- Map the PST files to the target Office 365 user mailboxes.
- Choose the migration destination in the Office 365 account.
- Use the tool’s built-in filters for selective mailbox migration.
- Choose to run the email transfer instantly or schedule it for a later time.
- When the migration is over, download a detailed report in a CSV file.
Does the tool preserve user-defined (custom) folder structure?
Yes. Be it Outlook’s default folder structure or a user-created custom folder structure, the tool will migrate it as it is. You get the same folder hierarchy in the destination as the source.
Do I need to install Outlook before migration?
No, you do not need Outlook installed on your system to import PST file to Office 365. It’s a standalone tool that works with or without Outlook.
Should I use an Office 365 admin account to transfer PST to Office 365?
Yes, to avoid any access issues during the migration, you must use an admin account with permissions like Mailbox Import Export Role.
I want to test the tool. Does the tool support free import PST to Office 365?
Yes, the tool comes with a 15-day trial version. It allows you to migrate 50 items per folder for free. For uninterrupted migration, you can buy the tool’s license anytime.
How will I know if any item is skipped or fails to migrate?
Our tool autogenerates a detailed migration report. You can view it directly from the tool to check if 100% data items are migrated. For any failed item, you can run the migration again using the incremental migration filter.
Can I migrate PST files to a different Office 365 account at the same time?
Yes, the tool allows you to create independent jobs with different destination Office 365 accounts. Each job runs in complete isolation.
Can the tool import large PST to Office 365?
Yes, the tool has no PST file size limitation; you can add the PST file of any size and easily import PST file to Office 365.

Abhishek Pandey is a Senior Technical Content Writer with expertise in email migration, cloud migration, and enterprise software documentation. He creates simple and accurate technical content that helps IT professionals and end users handle complex email and cloud technologies with confidence.