Outlook stores your mailbox data in the OST file that automatically saves to the default system location. It is unnoticed until the problems occur, like the drive running out of space or working slowly, which can also hamper the Outlook performance. So, it creates the need to change OST file location.
Since Outlook doesn’t provide a direct option to change OST location, users need to follow a stepwise approach to move it securely. This easy write-up will help you provide complete information about the concern, along with the practical methods to implement it successfully.
Why change location of Outlook OST file?
There are not many reasons to change location of Outlook OST file. But some of them are listed below:
- Freeing up disk space on the system drive.
- Moving the OST file to a faster storage device.
- To resolve synchronization issues with Exchange Server.
- To comply with IT policies and guidance.
- Shifting the OST mailbox to a shared location.
- Reducing the size of the mailbox.
- For resolving user profile-related issues.
Methods to change OST file location manually
As we discussed the reasons, now let's explore the top ways to change location of Outlook OST file manually. Properly follow each method's steps to get the desired outcomes.
Method 1. Change OST location by disabling Cached Exchange Mode
To change location of Outlook OST file, you need to make some changes in the account settings and provide a new location for the OST file. Follow the steps below carefully to achieve success:
Step 1. Launch Outlook and go to File >Account Settings >Account Settings.
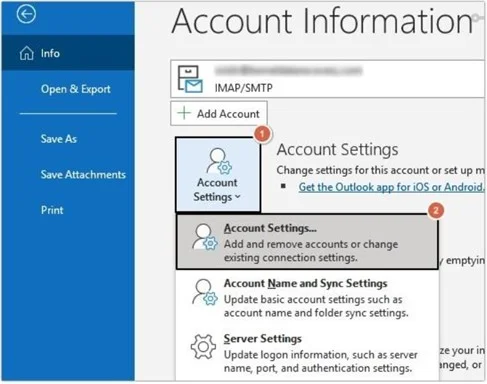
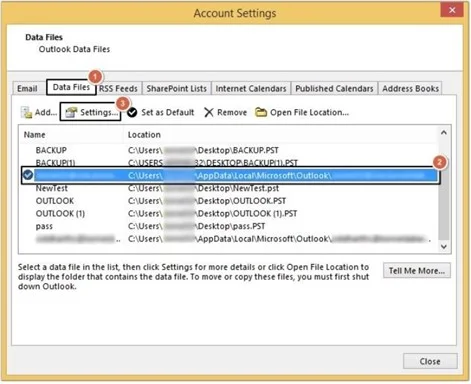
Step 2. Click Data Files >select Exchange account >Settings.
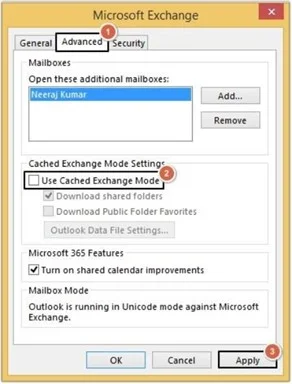
Step 3. Go to Advanced >uncheck Use Cached Exchange Mode >Apply.
Step 4. Restart Outlook & go to Data Files again.
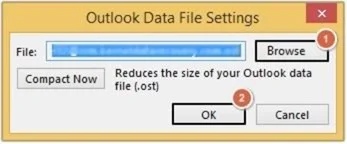
Step 5. Select the account and click on the Settings >Advanced >Outlook Data File Settings.
Step 6. Click Disable Offline Use, then Yes.
Step 7. Again, go to Outlook Data File Settings and click Browse to provide a new location for the OST file, and then click OK.
Step 8. Finally, check the Use Cache Exchange Mode and click OK.
Method 2. Change OST location by setting ForceOSTPath Registry Entry
Another solution to change OST file location is by using the ForceOSTPath registry keys.
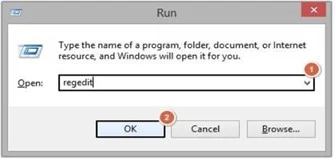
Step 1. Press Windows+R keys to open Run dialogue box. Type regedit and hit OK button to launch Registry Editor.
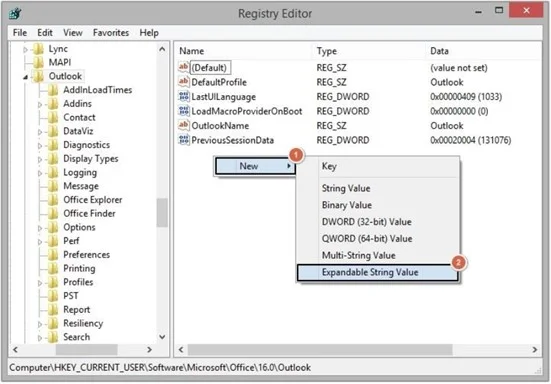
Step 2. Follow the paths mentioned below, as per your Outlook version,
Step 3. Right-click on the blank space and click New >Expandable String Value.
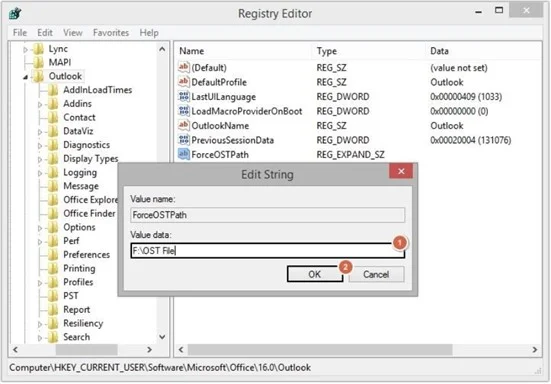
Step 4. Double-click on the ForceOSTPath and provide Value data, then click OK.
Method 3. Change OST location using Symbolic links
A symbolic link or soft link is also a helpful approach to change OST file location. It usually redirects the OST file default path to a new location. So, when Outlook tries to access the OST file in its default location, the OS follows the symbolic link to the new location of the actual file.
Here, we need to take the help of the mklink command to implement the method successfully.
Step 1. Close Outlook & other related applications.
Step 2. Change the OST file default location.
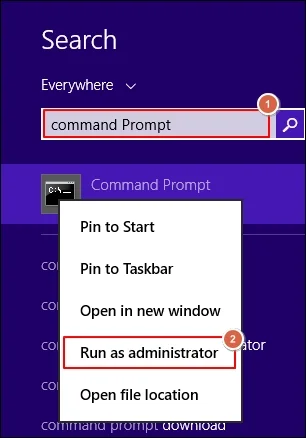
Step 3. Press Windows+Q keys & type Command Prompt. Right-click on it & select the "Run as Administrator".
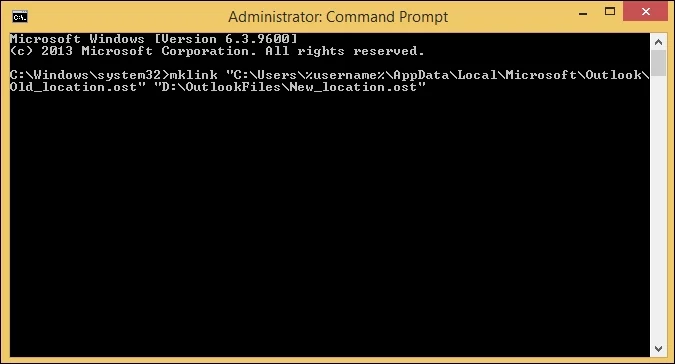
Step 4. Execute the following mklink command:
mklink "C:\Users\%username%\AppData\Local\Microsoft\Outlook\<filename>.ost" "D:\OutlookFiles\<filename>.ost"
Step 5. Restart Outlook and verify the changes.
Conclusion
Changing the OST location is not an easy task and can cause severe issues if anything goes unplanned. Thus, in such a scenario, you need a smart utility that can help in recovering your data.
One such great solution is the EmailXport OST Converter tool. This OST Converter tool seamlessly recovers data from an inaccessible or damaged OST file and converts it into PST, EML, MSG, HTML, DOC, and many other formats. Get the trial version today and convert 10 items per OST folder without any issues.
Frequently Asked Questions
Q. Can I change OST file location in Outlook?
Ans. Yes, you can change OST file location in Outlook by creating a new OST file and configuring Outlook to use the new location.
Q. Is changing the OST location manually 100% error-free?
Ans. No, the process to change OST location manually is not 100% error-free.
Q. What if my OST file becomes inaccessible while changing the OST mailbox location?
Ans. If your OST file becomes inaccessible while changing the OST mailbox location, then you need to repair it using third-party software. We recommend using the EmailXport OST Converter tool to do it.