Outlook uses the PST (Personal Storage Table) format to store all the mailbox data in one secure place. However, many users prefer to change PST file location due to limited drive space, to prevent PST corruption, to free up mailbox space, to fast backup, and other reasons. Changing the PST file location can be a simple and effective solution to resolve all the issues. In this blog, we will provide you with three manual methods to change Outlook PST location.
First, let’s know the reasons to change location of Outlook PST file.
Why Change Location of Outlook PST File?
Here is a list of some prominent reasons why users should change location of Outlook PST file:
- PST files can grow very large. Changing its location frees up space and prevents OS-level issues.
- Relocate the PST file to maintain a cleaner data backup and achieve better Outlook performance.
- Change PST location from a nearly full system drive to a healthier drive to prevent corruption.
- Moving PST to a shared network or external server helps multiple users to access the data freely.
How to Locate PST Files on Windows System?
Before you change location of Outlook PST file, first let’s know the location of PST files on the Windows System. There are two ways to locate PST files, the first one is manually, and the other one is by using Outlook. We will discuss both methods below in detail:
Use Outlook to locate the PST file
Users can easily locate PST files using Outlook. Here is the stepwise process to locate the files on your local system:
Step 1. Launch Outlook and go to File> Account Settings >Account Settings.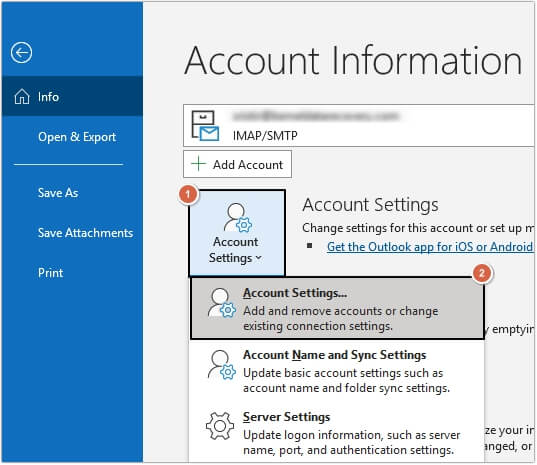
Step 2. Go to the Data Files tab, then select the required PST and click Open File Location.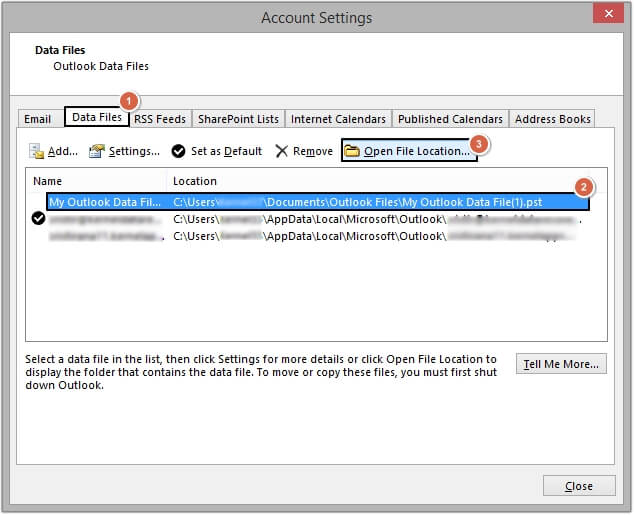
Step 3. A new window will pop up on your screen with the PST file.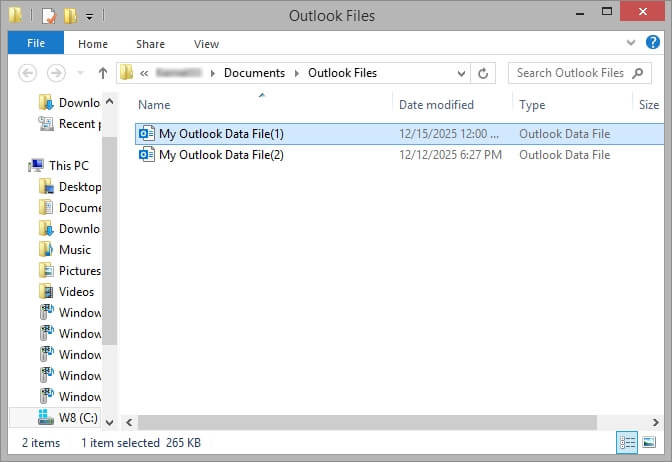
Manually locate the Outlook PST file
PST file location varies from Windows and Outlook version to version. We have created a detailed list of all the PST locations with the respective Windows and Outlook versions.
Outlook 2000, 2003, 2007: Windows XP
|
C:\Documents and Settings\UserName\Local Settings\Application Data\ Microsoft Outlook |
Outlook 2007: Windows Vista, 7, 8, 8.1, 10, 11
|
C:\Users\UserName\AppData\Local\Microsoft\Outlook |
Outlook 2010: Windows XP
|
My Documents\Outlook Files |
Outlook 2010: Windows Vista, 7, 8, 8.1, 10, 11
|
Documents\Outlook Files |
Outlook 2013, 2016, 2019, 2021: Windows Vista, 7, 8, 8.1, 10, 11
|
C:\Users\UserName\AppData\Local\Microsoft\Outlook |
Top Methods to Change PST File Location
Here are some tried and tested manual methods to change PST file location. Follow them carefully for guaranteed and accurate results:
Method 1. Move the PST file to change its location
Users need to take extra precautions when they move the PST file to a new location. The process needs to be performed in two stages to prevent errors in Outlook. Here are the detailed steps to do so:
Step 1. Make sure the Outlook application is closed correctly and locate the PST file on your system.
Step 2. Cut and paste the PST file to a new location.
Step 3. Open Outlook, and you’ll see an error on your screen.
Step 4. Click on the OK button and browse the new location of the PST file.
Step 5. Select the PST, then open it, and you’ll see all your email items on your screen.
Method 2. Change PST location with a Symbolic link
Another method to change location of Outlook PST file is using the Symbolic link. Here are the steps to do it:
Step 1. Go to the location of the PST file and copy the path address from the address bar.
Step 2. In the Search bar, type Command Prompt and right-click on it, then select Run as administrator.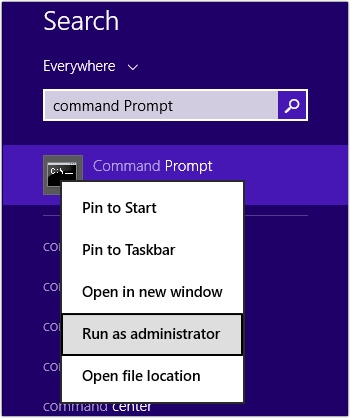
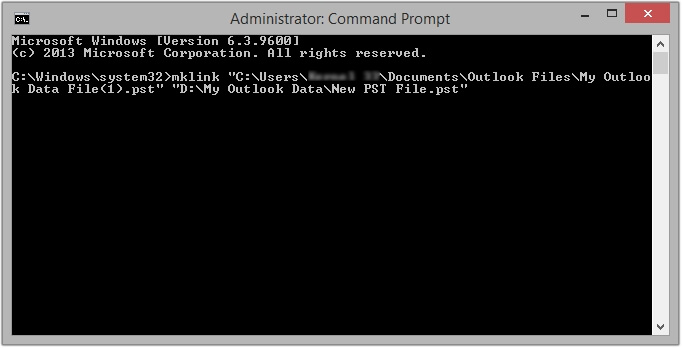
Step 3. Paste the copied path and execute it.
Note: The path should look like this:
|
mklink “C:\Users\%username%\Documents\Outlook Files\yourfile.pst” “D:\My Outlook Data\yourfile.pst” |
Once everything is done properly, use Outlook as earlier easily.
Method 3. Use Registry Editor to change PST file location
The Registry Editor method is for advanced users who have proper technical expertise. Here are the steps to change Outlook PST location using Registry Editor:
Step 1. Open the Run wizard and type regedit, then click OK.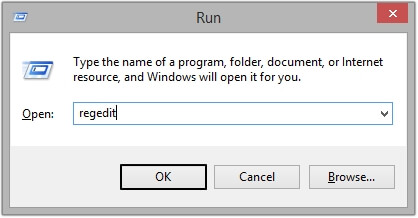
Step 2. A new window will open, navigate to the following path according to your Outlook version.
Outlook 2016: HKEY_CURRENT_USER\Software\Microsoft\Office\16.0\Outlook
Outlook 2013: HKEY_CURRENT_USER\Software\Microsoft\Office\15.0\Outlook
Outlook 2010: HKEY_CURRENT_USER\Software\Microsoft\Office\14.0\Outlook
Outlook 2007: HKEY_CURRENT_USER\Software\Microsoft\Office\12.0\Outlook
Outlook 2003: HKEY_CURRENT_USER\Software\Microsoft\Office\11.0\Outlook
Step 3. Right-click on the blank space and select New >Expandable String Value.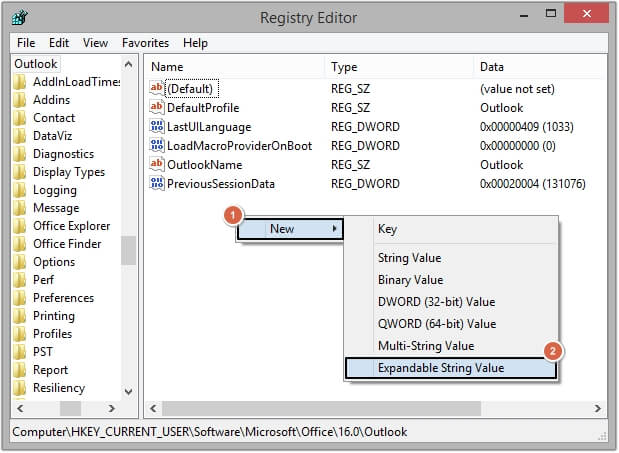
Step 4. Provide the name as ForcePSTPath and right-click on it, then select Modify.
Step 5. Provide Value data and click OK.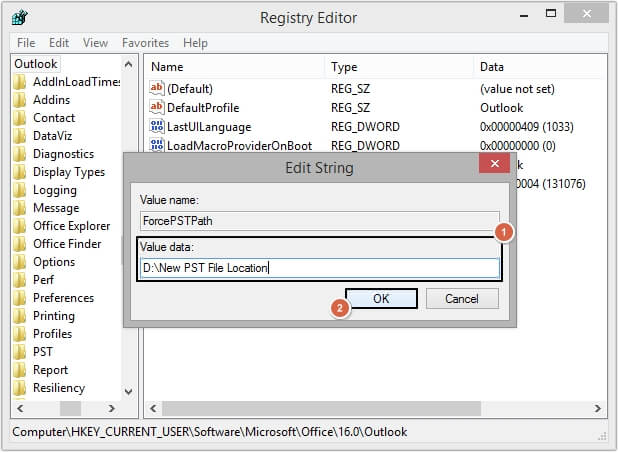
Step 6. Close everything correctly and then restart your system.
Final Thoughts
Users can change the PST file location to prevent Outlook crashes and freeze issues. This blog provides detailed step-by-step manual methods for error-free results. However, if your PST file becomes inaccessible while changing the location, you need to rebuild it instantly with an advanced PST Converter tool. We recommend using the EmailXport PST Converter to repair and convert corrupt or inaccessible PST files. EmailXport software comes with a free version that allows users to restore and convert 10 items per PST folder.
FAQs
A. To change Outlook PST location manually, you can use the Symbolic link, Registry Editor, or move it manually and configure it in Outlook again.
A. If the PST file is corrupted, then you should repair it using an advanced tool like the EmailXport PST Converter tool. The software smoothly repairs the file and converts its data into multiple formats.
A. MacOS doesn’t support PST files natively. To access or convert PST data on Mac, you need an automated tool like EmailXport Mac PST Converter, which converts PST files into Mac-supported formats.